Difference between revisions of "SO2R/Second radio window"
m (→Scenario control area: Added double-click shortcut to modify the scenarios) |
|||
| (26 intermediate revisions by 7 users not shown) | |||
| Line 1: | Line 1: | ||
| − | + | __NOTOC__ | |
| + | The Secondary Radio windows allows the operator in the SO2R category to control the program when using two radios. For this window to be enabled, either the SO2R or the Advanced SO2R option must be checked in the menu <tt>Operating | Technique</tt>. Then you can open this window by selecting <tt>Menu | Windows | Secondary radio</tt>. | ||
| + | |||
| + | [[Image:secondary_window.PNG|frame|center|The Secondary radio window]] | ||
| + | |||
| + | If you select <tt> Tools | Data Entry | Enable Run/S&P switching</tt>, an additional status line is displayed: | ||
| + | |||
| + | [[Image:SecondaryRadioRunSandP.png|frame|center|The Secondary radio window with the RUN and S&P radio options visible]] | ||
| + | |||
| + | The Secondary Radio window has up to five different areas: | ||
| + | |||
| + | ==Radio TX/RX information area== | ||
| + | |||
| + | If Radio1 TX led is red then radio 1 is transmitting. If Radio2 TX led is red then radio 2 is transmitting. | ||
| + | If Radio1 RX led is red then audio from radio 1 is in both ears of headphone. If Radio 2 RX led is red then audio from radio 2 is in both ears of headphone. If both Radio1 and Radio2 RX led are red then audio from radio 1 is in left ear of headphone and audio from radio 2 is in right ear of headphone. | ||
| + | |||
| + | ==Headphone audio control area== | ||
| + | |||
| + | With a mouse click the operator can control to what radio the headphone is switched to. Clicking the Primary button switches the headphones audio to the primary radio. Clicking the Secondary button switches the headphones audio to the secondary radio. Clicking the Both button switches the headphones audio to both ears (radio 1 in left ear and radio 2 in right ear). | ||
| + | |||
| + | Latch mode switches the headphones to the secondary radio during transmit (sometimes called "headphone latch"). To activate latch mode, check the "Latch mode" box near the top right of the secondary radio window. If this box is disabled (grayed out), it means that your SO2R controller does not support the required commands. Configuring either a microHAM or EZMaster SO2R controller in Win-Test will enable this feature. | ||
| + | |||
| + | ===Latch Mode specifics=== | ||
| + | |||
| + | On SSB, latch mode is needed because audio can be generated manually by the operator using a microphone. In this case the operator is talking and does not push '''<tt>[F1]-[F7]</tt>''' keys so he cannot activate the automatic audio/transmission present in the respective scenarios. | ||
| + | Audio can also be generated automatically either from the sound card or from an external voice keyer using the '''<tt>[F1]-[F7]</tt>''' keys. In this situation scenarios work OK. | ||
| + | |||
| + | On CW, using scenarios, latch mode is not needed, because the scenarios will control audio switching according to the audio variables ('''<tt>$R1R1</tt>''', '''<tt>$R1R2</tt>''', '''<tt>$R2R2</tt>''') and transmission is automatically generated by the '''<tt>[F1]-[F7]</tt>''', '''<tt>[Insert]</tt>''' and '''<tt>[Plus]</tt>''' keys (CW messages). | ||
| + | When using an external CW keyer for quick chat in a contest QSO, usually the operator needs to hear his CW, so audio can be controlled manually either listening just to primary radio or both radios. | ||
| + | |||
| + | ==Scenario control area== | ||
| + | |||
| + | The operator can select different scenarios to automatically control headphone audio at each step when making a QSO. There are five pre-defined scenarios: Plain pile up, Heavy pile up, Multiplier, Alternate CQ and Check Band. These scenarios can be created or modified by using [[Menu:Operating#Modify_the_scenarios|'''<tt>Operating | Modify the scenarios</tt>''']], or by simply ''double-clicking'' on the scenario ''name''. The user can configure up to eight different scenarios. The scenarios can be simple or complicated, matching the SO2R skills of the operator[http://www.qsl.net/ct1boh/so2r.htm]. | ||
| + | |||
| + | To select and activate a scenario, click the corresponding radio button, or use '''<tt>[AltGr-1]</tt>'''...'''<tt>[AltGr-8]</tt>'''. On a U.S. keyboard, use '''<tt>[Ctrl-Alt-1]</tt>'''...'''<tt>[Ctrl-Alt-8]</tt>'''. | ||
| + | |||
| + | To ''edit'' any of the listed scenarios, ''double-click'' on the scenario ''name''. | ||
| + | |||
| + | ==RUN or S/P area== | ||
| + | |||
| + | You can toggle the secondary radio between RUN and S/P (Search and pounce) modes by selecting a mode with the mouse. The RUN/S&P mode affects which set of messages are sent when the secondary radio window is activated. | ||
| + | |||
| + | ==Secondary radio log fields area== | ||
| + | |||
| + | This area shows the callsign, RST sent, RST received and zone received of the secondary radio prior to insert the callsign in the log. In order to write calls in the callsign field of the secondary radio tick first in the menu <tt>Operating | Shift binds to the secondary radio</tt> and/or <tt>Operating | Caps Lock binds to the secondary radio</tt>. | ||
| + | |||
| + | Imagine Radio1 is the primary radio being used to RUN and Radio2 is secondary radio being used to S&P. The operator spots a new multiplier on Radio2. In order to put the call in the callsign field, the operator must press the '''<tt>[Shift]</tt>''' key while typing the call. If the operator does not press the '''<tt>[Shift]</tt>''' key then the call will go into the primary radio callsign field. Another way is to activate the '''<tt>[Caps Lock]</tt>''' key. While activated what you write in the keyboard goes to the secondary radio. | ||
Latest revision as of 23:56, 1 October 2010
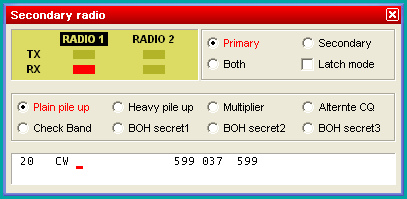
The Secondary Radio windows allows the operator in the SO2R category to control the program when using two radios. For this window to be enabled, either the SO2R or the Advanced SO2R option must be checked in the menu Operating | Technique. Then you can open this window by selecting Menu | Windows | Secondary radio.
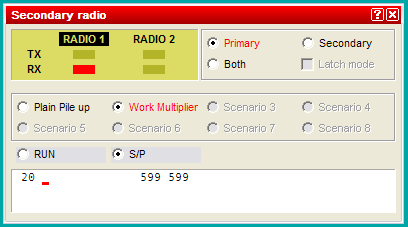
If you select Tools | Data Entry | Enable Run/S&P switching, an additional status line is displayed:
The Secondary Radio window has up to five different areas:
Radio TX/RX information area
If Radio1 TX led is red then radio 1 is transmitting. If Radio2 TX led is red then radio 2 is transmitting. If Radio1 RX led is red then audio from radio 1 is in both ears of headphone. If Radio 2 RX led is red then audio from radio 2 is in both ears of headphone. If both Radio1 and Radio2 RX led are red then audio from radio 1 is in left ear of headphone and audio from radio 2 is in right ear of headphone.
Headphone audio control area
With a mouse click the operator can control to what radio the headphone is switched to. Clicking the Primary button switches the headphones audio to the primary radio. Clicking the Secondary button switches the headphones audio to the secondary radio. Clicking the Both button switches the headphones audio to both ears (radio 1 in left ear and radio 2 in right ear).
Latch mode switches the headphones to the secondary radio during transmit (sometimes called "headphone latch"). To activate latch mode, check the "Latch mode" box near the top right of the secondary radio window. If this box is disabled (grayed out), it means that your SO2R controller does not support the required commands. Configuring either a microHAM or EZMaster SO2R controller in Win-Test will enable this feature.
Latch Mode specifics
On SSB, latch mode is needed because audio can be generated manually by the operator using a microphone. In this case the operator is talking and does not push [F1]-[F7] keys so he cannot activate the automatic audio/transmission present in the respective scenarios. Audio can also be generated automatically either from the sound card or from an external voice keyer using the [F1]-[F7] keys. In this situation scenarios work OK.
On CW, using scenarios, latch mode is not needed, because the scenarios will control audio switching according to the audio variables ($R1R1, $R1R2, $R2R2) and transmission is automatically generated by the [F1]-[F7], [Insert] and [Plus] keys (CW messages). When using an external CW keyer for quick chat in a contest QSO, usually the operator needs to hear his CW, so audio can be controlled manually either listening just to primary radio or both radios.
Scenario control area
The operator can select different scenarios to automatically control headphone audio at each step when making a QSO. There are five pre-defined scenarios: Plain pile up, Heavy pile up, Multiplier, Alternate CQ and Check Band. These scenarios can be created or modified by using Operating | Modify the scenarios, or by simply double-clicking on the scenario name. The user can configure up to eight different scenarios. The scenarios can be simple or complicated, matching the SO2R skills of the operator[1].
To select and activate a scenario, click the corresponding radio button, or use [AltGr-1]...[AltGr-8]. On a U.S. keyboard, use [Ctrl-Alt-1]...[Ctrl-Alt-8].
To edit any of the listed scenarios, double-click on the scenario name.
RUN or S/P area
You can toggle the secondary radio between RUN and S/P (Search and pounce) modes by selecting a mode with the mouse. The RUN/S&P mode affects which set of messages are sent when the secondary radio window is activated.
Secondary radio log fields area
This area shows the callsign, RST sent, RST received and zone received of the secondary radio prior to insert the callsign in the log. In order to write calls in the callsign field of the secondary radio tick first in the menu Operating | Shift binds to the secondary radio and/or Operating | Caps Lock binds to the secondary radio.
Imagine Radio1 is the primary radio being used to RUN and Radio2 is secondary radio being used to S&P. The operator spots a new multiplier on Radio2. In order to put the call in the callsign field, the operator must press the [Shift] key while typing the call. If the operator does not press the [Shift] key then the call will go into the primary radio callsign field. Another way is to activate the [Caps Lock] key. While activated what you write in the keyboard goes to the secondary radio.

