Difference between revisions of "RTTY"
| (27 intermediate revisions by 5 users not shown) | |||
| Line 1: | Line 1: | ||
| − | + | Win-Test includes support for RTTY contests using the MMTTY engine. | |
| − | + | ==Downloading MMTTY== | |
| − | + | {{wbox|Note|If you're already using N1MM Logger or WriteLog, you may already have this installed so it's worthwhile checking before-hand.}} | |
| − | ''' | + | Win-Test uses MMTTY by JE3HHT, so the first task, before you can start operating RTTY, is to go to the [http://hamsoft.ca/pages/mmtty.php MMTTY home page], scroll to the '''Downloads''' section, download and run '''MMTTY168A.exe'''. For SO2R operating, you will need to install MMTTY twice, in two separate directories. |
| − | + | If you do ''not'' have a microHAM device, and you wish to use FSK instead of AFSK, be sure to download and install the [http://hamsoft.ca/pages/mmtty/ext-fsk.php EXTFSK extension], which is a ZIP file named '''ExtFSK106.zip''' (at bottom of page). Details for setting up EXTFSK can be found at [http://hamsoft.ca/pages/mmtty/ext-fsk.php the MM HAMSOFT site] provided by VE5KC, and on AA5AU's extensive [http://www.aa5au.com/rtty/ Getting Started on RTTY] pages. | |
| − | + | EXTFSK is ''not'' recommended or needed when using most microHAM devices as your RTTY interface. See [http://lists.f5mzn.org/pipermail/support/2013-September/083201.html this post] by W4TV. | |
| − | We recommend setting up MMTTY as a standalone application first, before integrating it into Win-Test | + | We recommend setting up MMTTY as a standalone application first, before integrating it into Win-Test, especially if you wish to get FSK going. Although it's possible to control your radio from MMTTY, PLEASE DO NOT configure this, as it will interfere with Win-Test's rig control. Set up only RTTY decoding, RTTY keying, and PTT through the sound card and/or COM ports. |
| − | Now you are ready to set up Win-Test to launch MMTTY | + | Now you are ready to set up Win-Test to launch MMTTY. |
| − | ==Configuring | + | ==Configuring received data logging on MMTTY (optional) == |
| − | If you want to keep all sent and received RTTY characters in a text file, then you should activate logging in MMTTY | + | If you want to keep all sent and received RTTY characters in a text file, then you should activate logging in MMTTY, since Win-Test has no option to log all the RTTY data received. |
| − | To configure logging, start MMTTY (from the desktop, not from Win-Test!), then select '''<tt>File(F) | Options of Received-log </tt>''' to configure the file the information is written to, and enable timestamps. Next select '''<tt>File(F) | Log Rx file(L)</tt>''' to activate Logging. | + | To configure logging, start MMTTY (from the desktop, not from Win-Test!), then select '''<tt>File(<u>F</u>) | Options of Received-log </tt>''' to configure the file the information is written to, and enable timestamps. Next select '''<tt>File(<u>F</u>) | Log Rx file(<u>L</u>)</tt>''' to activate Logging. |
Now close MMTTY and restart it to check whether the options are still set correctly. You might need to save the MMTTY options as a profile. Now check the log file. It should have more than 0 bytes and contain data like this: | Now close MMTTY and restart it to check whether the options are still set correctly. You might need to save the MMTTY options as a profile. Now check the log file. It should have more than 0 bytes and contain data like this: | ||
| Line 30: | Line 30: | ||
<071113 17:07:04 MMTTY Close> | <071113 17:07:04 MMTTY Close> | ||
| − | If all works properly, shut down MMTTY and go back to Win-Test | + | If all works properly, shut down MMTTY and go back to Win-Test. |
| − | + | {{wbox|Note|MMTTY saves are buffered, so you might not see all the data logged immediately. After you close MMTTY (or Win-Test), the file will be closed, and everything will be saved.}} | |
==Win-Test RTTY configuration== | ==Win-Test RTTY configuration== | ||
| − | + | Now that you've got the engine downloaded and installed, it's time to fire up Win-Test and get things set up! | |
==== Open the RTTY configuration box ==== | ==== Open the RTTY configuration box ==== | ||
| + | |||
| + | Open a contest file for a RTTY contest. Once it has loaded, right-click on the Win-Test logging window, and select '''RTTY configuration...''', or just type the text command '''<tt>RTTYSETUP</tt>''' in the logging window, and press <tt>[Enter]</tt>. | ||
| + | |||
[[Image:Rtty config rightclick.gif|frame|center|Main screen right click]] | [[Image:Rtty config rightclick.gif|frame|center|Main screen right click]] | ||
| − | + | === Enable MMTTY === | |
| + | |||
| + | After selecting '''RTTY configuration''', you will see the dialog below: | ||
| − | === | + | [[Image:OptionsRttyConfiguration.PNG|frame|center|RTTY Configuration dialog]] |
| + | |||
| + | ; Run MMTTY : Check this box and add the path to the MMTTY executable file (.exe). You may use the '''Browse''' button to navigate to the MMTTY installation directory to highlight MMTTY.EXE, then click '''Open''' to select the file and fill in the text box. | ||
| + | {{wbox|Note| If you want to do SO2R RTTY (with two radios) you need two installations of the MMTTY engine, in separate directories, one for each radio. Add the path to the second copy of MMTTY.exe in the '''Path of MMTTY for Radio 2''' text box as shown above.}} | ||
| + | ; MMTTY window stays on top : Enable this option to have the MMTTY window painted on top of other windows, which is helpful when tuning in RTTY signals. | ||
| + | ; Only show FFT spectrum, waterfall and XY scope : Enable this option to display a smaller MMTTY window without a menu or the other MMTTY controls: | ||
| + | [[Image:MmttyXyScopeOnly.png|center|frame|Reduced MMTTY plugin window]] | ||
| + | ; INSERT key grabs highlighted callsigns from the RTTY window : Enable this option to load the most recent highlighted callsign into the logging window automatically when you press the <tt>[Insert]</tt> key, without having to click on it with the mouse. | ||
| + | ; Favor multipliers : Enable this sub-option to have the <tt>[Insert]</tt> key pick the most recent callsign that is a new multiplier, even if there are more recent highlighted callsigns (that are not new multipliers). | ||
| + | ; Activate single mouse click grabbing : Enable this option to use a single-left-click of the mouse, rather than a double-left-click, to load a callsign into the logging window. Note: use a '''middle-click''' (press down on scroll wheel) to load a callsign into the [[Menu:Windows#Partner|Partner window / callsign stack]]. | ||
| + | ; Radio is automatically activated by a mouse click in the window : Enable this option when using SO2R mode to switch transmitters simply by clicking on the appropriate RTTY window. | ||
| + | |||
| + | Be sure to click '''OK''' to exit. | ||
| + | |||
| + | If '''Run MMTTY''' was enabled, the MMTTY window should open automatically after you press '''OK'''. If you have configured MMTTY to run standalone before, everything should start to work right away. | ||
| + | |||
| + | === Set up MMTTY PTT COM Port === | ||
| + | Win-Test and MMTTY run as two separate programs. Only one program can use a COM port at a time. You cannot tell both Win-Test and MMTTY to use the same COM port for PTT. For RTTY mode, only MMTTY should control the COM port used for PTT, not Win-Test: | ||
| + | |||
| + | [[Image:MMTTY_PTT_Port.png|frame|center|MMTTY PTT and FSK via COM port pins. Click the Radio Command button to set Radio port to NONE.]] | ||
| + | |||
| + | Similarly, only Win-Test should control the COM port used for rig control (CAT commands), not MMTTY. Under the '''TX''' tab on MMTTY Setup, click the '''Radio Command''' button and make sure that the '''Port''' in that sub-dialog is set to '''None''': | ||
| + | |||
| + | [[Image:MMTTY_Radio_Command_Port.png|frame|center|MMTTY Radio Command (CAT) port. Radio port should be set to NONE here because Win-Test needs exclusive access to this port for rig control.]] | ||
| − | + | === Testing === | |
| − | + | Try to receive and decode a RTTY signal. If that works, try to key the transmitter and get on the air by pressing '''Alt-K''' (keyboard mode), then type some text. Press '''Alt-K''' again to end transmissions. If you can monitor your signal, you should now hear the typical RTTY diddle. | |
| − | + | In case you still need to set up something in MMTTY, you may do so without exiting Win-Test by clicking '''Options | Setup''' in the MMTTY sub-window (to access the MMTTY menu, you must first disable the '''<tt>RTTYSETUP</tt>''' option '''Only show FFT spectrum, waterfall and XY scope''' if previously enabled). | |
| − | + | Note that you might need the EXTFSK extension for MMTTY if you are using MMTTY via an USB-to-serial adapter rather than a "real" (legacy) serial port. | |
| − | + | ==== microHAM interfaces ==== | |
| − | + | EXTFSK is ''not'' recommended or needed when using most microHAM devices as your RTTY interface. See [http://lists.f5mzn.org/pipermail/support/2013-September/083201.html this post] by W4TV. | |
| − | ''' | + | See the [http://www.microham.com/contents/en-us/d190_Click_here_to_edit_title.html Logger Setup Guides] on the [http://www.microham.com microHAM Web Site] for detailed instructions. Click '''Support''', '''Application Notes''', '''Logger Setup Guides''', select your device, then click '''Win-Test''' for a microHAM PDF document with detailed screen shots showing how to use the device with Win-Test. |
| − | === | + | For FSK, in the MMTTY '''Misc''' tab, set '''Tx Port''' to COM-TxD(FSK). Select the '''USB Port''' button next to this option, and select option "C" '''Limiting speed''', and click '''OK'''. You can find this setting in the Logger Setup Guides documentation on the microHAM website. |
| + | |||
| + | [[Image:MMTTY-USB-Port-Option.png|center|frame|MMTTY USB Port Option - Option C is recommended]] | ||
| + | |||
| + | ==== LPT port ==== | ||
| − | [ | + | According to [http://lists.f5mzn.org/pipermail/support/2007-September/074597.html this post by IZ4EFN], FSK keying is also possible through the LPT port. It involves installing and configuring '''TDLPortIO.dll''' as well as EXTFSK. |
| − | + | == General usage == | |
| − | + | Once you have everything set up, here's a basic guide to logging QSOs. Press '''[F1]''' or click F1 in the RTTY Window to call CQ. Press or click '''[Ins]''' to load the most recently highlighted callsign into the logging window and send the exchange. Press or click '''[+]''' to send the TU message and log the QSO. Press or click '''[F7]''' to send the "?" message. | |
| − | + | === RTTY window === | |
| − | + | By default, Win-Test doesn't open the RTTY window(s) automatically. From the Win-Test menu, select '''<tt>Windows | RTTY(radio 1)</tt>'''. This will open the RTTY receive window for Radio 1. | |
| − | + | If you're running SO2R RTTY, select '''<tt>Windows | RTTY(radio 2)</tt>''', which will open a second RTTY receive window for Radio 2. | |
| − | [[Image: | + | [[Image:RttyWindow.PNG|frame|center|RTTY TX/RX Window. The blue highlighting of the two callsigns UA3PAB and N4TV means: these are new callsigns yet to be worked.]] |
| − | + | Highlight colors: | |
| + | ; Blue : New callsigns | ||
| + | ; Yellow : New multipliers | ||
| + | ; Green : New double-multipliers | ||
| + | ; Red : Duplicate callsigns (dupes) | ||
| − | + | Your own transmissions will be displayed in blue text. | |
| − | + | With the mouse cursor, you can double-click (or single-click, if the option is enabled) on a callsign, and it will be copied to the callsign entry field in the logging window. Remember that pressing <tt>[Insert]</tt> when the callsign entry field is empty will copy the most recently highlighted callsign into the callsign field. Clicking on a contest exchange will copy it into the received exchange field. '''Middle-clicking''' on a callsign (click on mouse wheel) will transfer the call to the [[Menu:Windows#Partner|Partner window / callsign stack]]. | |
| − | + | ====Context Menu==== | |
| − | + | [[Image:RttyWindowContextMenu.png|frame|center|RTTY Context Menu.]] | |
| − | + | Right-click of the mouse brings up a context menu, containing the '''INVERT''' feature. This feature allows you to invert (change from baudot characters to figures) selected text. First select the text to be inverted with the left mouse button and then hit the right mouse button and '''INVERT''' the text. Thus '''TOO QWE''' will become '''599 123'''. | |
| − | + | '''Stream Logging''' will - when enabled - log all RTTY RX and TX traffic to an ASCII file named '''{filename}.ry1''' | |
| + | for the RTTY Window 1 and '''{filename}.ry2''' for RTTY Window 2. This is usefule for later review of potentially broken QSOs. | ||
| − | + | ====Function Keys==== | |
| + | Most of the function keys have a corresponding button at the bottom of the RTTY window which you may click with the mouse to activate instead of using the keyboard. Clicking on a function key button while holding down the '''[Shift]''' key will allows you to reprogram the contents of a message button quickly. All RTTY messages may be edited at once via '''Options | RTTY | Modify standard messages ...''' or the text command shortcut '''<tt>MSGS</tt>''' <tt>[Enter]</tt>. | ||
| − | + | Pressing the '''Alt+K''' button toggles in and out of keyboard mode so you can type and transmit any text real-time. | |
| − | |||
| − | + | Pressing the '''(C)''' button clears the TX/RX window. | |
| − | [ | + | To scroll text in the RTTY window, drag the scroll bar with the left mouse button, or turn the mouse wheel. '''[Shift] + mouse wheel''' will jump to the beginning or the end of the RTTY window. |
| − | + | Most routine situations in RTTY contests can be handled with the mouse alone, without pressing any key. | |
| − | + | === Defining messages === | |
| − | + | Most of the RTTY messages are already set up for you to use by default, but often you will want to change them. Use $13 in a message to send a Carriage Return (CR). See [[Message_variables|Message Variables]] for a complete list. | |
| − | + | All RTTY messages may be edited at once via '''Options | RTTY | Modify standard messages ...''' or the text command shortcut '''<tt>MSGS</tt>''' <tt>[Enter]</tt>. | |
| − | + | You can also quickly edit a single message. To do this, press '''<tt>Shift-F1 .. F7</tt>''', '''<tt>Shift-[Insert]</tt>''', or '''<tt>Shift-[+]</tt>'''. Note: if you're operating in SO2R mode with '''Shift Binds to Secondary Radio''' enabled, you must use the '''<tt>[AltGr]</tt>''' (or '''<tt>[Ctrl]+[Alt]</tt>''') keys instead of the '''<tt>[Shift]</tt>''' key to reprogram messages. | |
[[Image:Rtty macros.gif|frame|center|RTTY Macros]] | [[Image:Rtty macros.gif|frame|center|RTTY Macros]] | ||
| − | + | As the '''<tt>++</tt>''' and '''<tt>--</tt>''' speed accelerators used for CW do not make sense on RTTY, you should remove them. | |
| + | Once you're done, click '''Validate''' to close the window. | ||
| − | + | Please see the [[DVK_CW_RTTY_Messaging#Configuring_CW.2FRTTY_messages|Configuring CW/RTTY messages]] page for more details. | |
| − | |||
| − | |||
| − | Please see | ||
=== MMTTY window === | === MMTTY window === | ||
| − | [[Image:Rtty mmtty.gif|frame|center|MMTTY Window | + | You may occasionally encounter a problem with the cursor disappearing or the application loses focus. To recover, minimize and restore Win-Test using the mouse. |
| + | |||
| + | [[Image:Rtty mmtty.gif|frame|center|MMTTY Window]] | ||
| − | The above screenshot is of the MMTTY window | + | The above screenshot is of the MMTTY window in normal mode when operating RTTY. This is when '''Only show FFT spectrum, waterfall and XY scope''' is disabled. |
| − | This is a mimimized version of MMTTY, but it allows you to change most of the settings. For example, to enable the XY scope (the two ellipsoides) go to the '''<tt>View</tt>''' menu of MMTTY and tick the '''<tt> | + | This is a mimimized version of MMTTY, but it allows you to change most of the settings. For example, to enable the XY scope (the two ellipsoides) go to the '''<tt>View</tt>''' menu of MMTTY and tick the '''<tt>XYScope</tt>''' option. For the rest of the bells and whistles of MMTTY, please see the online help of that software. |
== See also == | == See also == | ||
| − | [http://www.rttycontesting.com/ RTTY Contesting.com]: Great tutorials on how to use MMTTY. | + | * [http://www.microham.com/contents/en-us/d190_Click_here_to_edit_title.html microHAM Logger Setup Guides] |
| + | * [http://www.aa5au.com/rtty/ Getting Started on RTTY] - very detailed MMTTY set-up guide by AA5AU | ||
| + | * [[BestPractice1|Getting ready for a RTTY Contest]] | ||
| + | * [[BestPractice4|Setting up an Kenwood TS-850S with the microHAM microKeyer]] | ||
| + | * [http://www.rttycontesting.com/ RTTY Contesting.com]: Great tutorials on how to use MMTTY. | ||
Latest revision as of 11:23, 30 December 2021
Win-Test includes support for RTTY contests using the MMTTY engine.
Downloading MMTTY
Note: If you're already using N1MM Logger or WriteLog, you may already have this installed so it's worthwhile checking before-hand.
Win-Test uses MMTTY by JE3HHT, so the first task, before you can start operating RTTY, is to go to the MMTTY home page, scroll to the Downloads section, download and run MMTTY168A.exe. For SO2R operating, you will need to install MMTTY twice, in two separate directories.
If you do not have a microHAM device, and you wish to use FSK instead of AFSK, be sure to download and install the EXTFSK extension, which is a ZIP file named ExtFSK106.zip (at bottom of page). Details for setting up EXTFSK can be found at the MM HAMSOFT site provided by VE5KC, and on AA5AU's extensive Getting Started on RTTY pages.
EXTFSK is not recommended or needed when using most microHAM devices as your RTTY interface. See this post by W4TV.
We recommend setting up MMTTY as a standalone application first, before integrating it into Win-Test, especially if you wish to get FSK going. Although it's possible to control your radio from MMTTY, PLEASE DO NOT configure this, as it will interfere with Win-Test's rig control. Set up only RTTY decoding, RTTY keying, and PTT through the sound card and/or COM ports.
Now you are ready to set up Win-Test to launch MMTTY.
Configuring received data logging on MMTTY (optional)
If you want to keep all sent and received RTTY characters in a text file, then you should activate logging in MMTTY, since Win-Test has no option to log all the RTTY data received.
To configure logging, start MMTTY (from the desktop, not from Win-Test!), then select File(F) | Options of Received-log to configure the file the information is written to, and enable timestamps. Next select File(F) | Log Rx file(L) to activate Logging.
Now close MMTTY and restart it to check whether the options are still set correctly. You might need to save the MMTTY options as a profile. Now check the log file. It should have more than 0 bytes and contain data like this:
  <071113 17:07:04 MMTTY Startup>
  <071113 17:07:07 TX>
  TEST TEST TEST
  <071113 17:07:10 RX>
  DSGFIEUGSLD  SFGAF G
  <071113 17:07:04 MMTTY Close>
If all works properly, shut down MMTTY and go back to Win-Test.
Note: MMTTY saves are buffered, so you might not see all the data logged immediately. After you close MMTTY (or Win-Test), the file will be closed, and everything will be saved.
Win-Test RTTY configuration
Now that you've got the engine downloaded and installed, it's time to fire up Win-Test and get things set up!
Open the RTTY configuration box
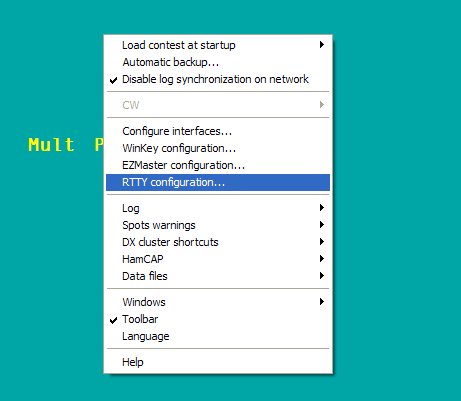
Open a contest file for a RTTY contest. Once it has loaded, right-click on the Win-Test logging window, and select RTTY configuration..., or just type the text command RTTYSETUP in the logging window, and press [Enter].
Enable MMTTY
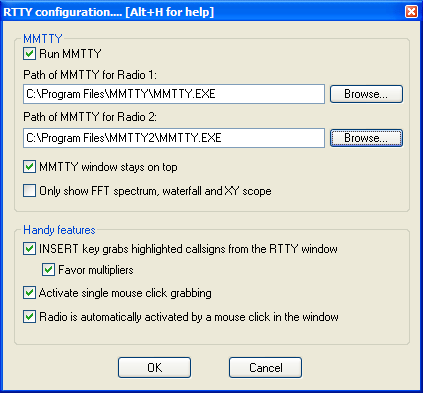
After selecting RTTY configuration, you will see the dialog below:
- Run MMTTY
- Check this box and add the path to the MMTTY executable file (.exe). You may use the Browse button to navigate to the MMTTY installation directory to highlight MMTTY.EXE, then click Open to select the file and fill in the text box.
Note: If you want to do SO2R RTTY (with two radios) you need two installations of the MMTTY engine, in separate directories, one for each radio. Add the path to the second copy of MMTTY.exe in the Path of MMTTY for Radio 2 text box as shown above.
- MMTTY window stays on top
- Enable this option to have the MMTTY window painted on top of other windows, which is helpful when tuning in RTTY signals.
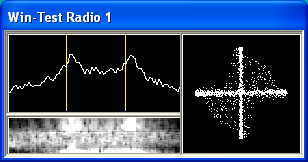
- Only show FFT spectrum, waterfall and XY scope
- Enable this option to display a smaller MMTTY window without a menu or the other MMTTY controls:
- INSERT key grabs highlighted callsigns from the RTTY window
- Enable this option to load the most recent highlighted callsign into the logging window automatically when you press the [Insert] key, without having to click on it with the mouse.
- Favor multipliers
- Enable this sub-option to have the [Insert] key pick the most recent callsign that is a new multiplier, even if there are more recent highlighted callsigns (that are not new multipliers).
- Activate single mouse click grabbing
- Enable this option to use a single-left-click of the mouse, rather than a double-left-click, to load a callsign into the logging window. Note: use a middle-click (press down on scroll wheel) to load a callsign into the Partner window / callsign stack.
- Radio is automatically activated by a mouse click in the window
- Enable this option when using SO2R mode to switch transmitters simply by clicking on the appropriate RTTY window.
Be sure to click OK to exit.
If Run MMTTY was enabled, the MMTTY window should open automatically after you press OK. If you have configured MMTTY to run standalone before, everything should start to work right away.
Set up MMTTY PTT COM Port
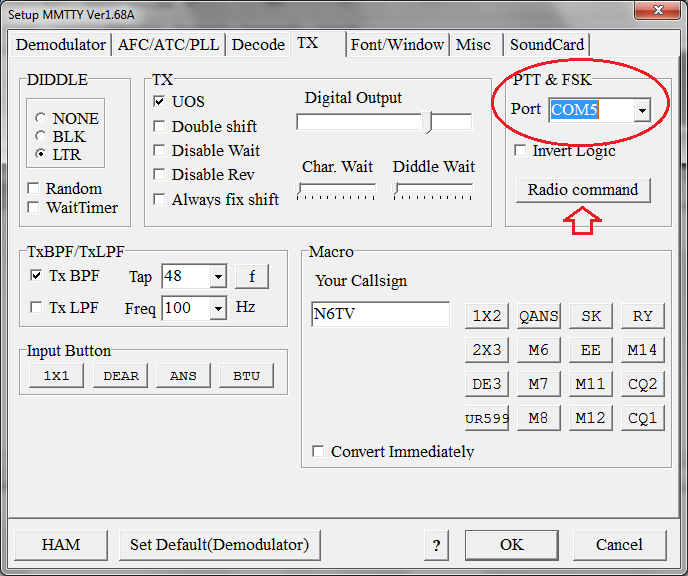
Win-Test and MMTTY run as two separate programs. Only one program can use a COM port at a time. You cannot tell both Win-Test and MMTTY to use the same COM port for PTT. For RTTY mode, only MMTTY should control the COM port used for PTT, not Win-Test:
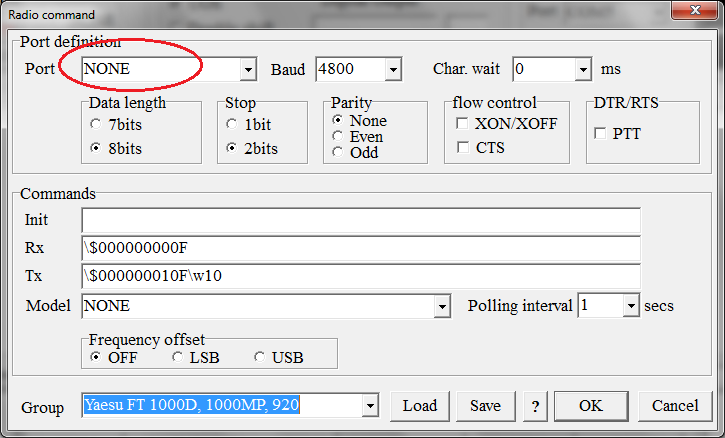
Similarly, only Win-Test should control the COM port used for rig control (CAT commands), not MMTTY. Under the TX tab on MMTTY Setup, click the Radio Command button and make sure that the Port in that sub-dialog is set to None:
Testing
Try to receive and decode a RTTY signal. If that works, try to key the transmitter and get on the air by pressing Alt-K (keyboard mode), then type some text. Press Alt-K again to end transmissions. If you can monitor your signal, you should now hear the typical RTTY diddle.
In case you still need to set up something in MMTTY, you may do so without exiting Win-Test by clicking Options | Setup in the MMTTY sub-window (to access the MMTTY menu, you must first disable the RTTYSETUP option Only show FFT spectrum, waterfall and XY scope if previously enabled).
Note that you might need the EXTFSK extension for MMTTY if you are using MMTTY via an USB-to-serial adapter rather than a "real" (legacy) serial port.
microHAM interfaces
EXTFSK is not recommended or needed when using most microHAM devices as your RTTY interface. See this post by W4TV.
See the Logger Setup Guides on the microHAM Web Site for detailed instructions. Click Support, Application Notes, Logger Setup Guides, select your device, then click Win-Test for a microHAM PDF document with detailed screen shots showing how to use the device with Win-Test.
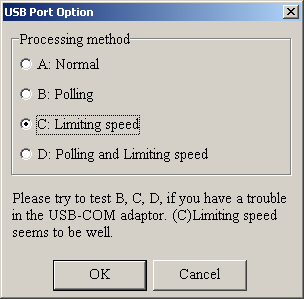
For FSK, in the MMTTY Misc tab, set Tx Port to COM-TxD(FSK). Select the USB Port button next to this option, and select option "C" Limiting speed, and click OK. You can find this setting in the Logger Setup Guides documentation on the microHAM website.
LPT port
According to this post by IZ4EFN, FSK keying is also possible through the LPT port. It involves installing and configuring TDLPortIO.dll as well as EXTFSK.
General usage
Once you have everything set up, here's a basic guide to logging QSOs. Press [F1] or click F1 in the RTTY Window to call CQ. Press or click [Ins] to load the most recently highlighted callsign into the logging window and send the exchange. Press or click [+] to send the TU message and log the QSO. Press or click [F7] to send the "?" message.
RTTY window
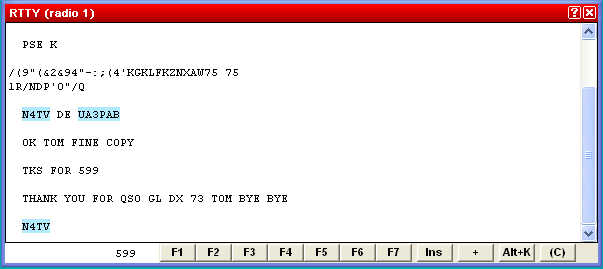
By default, Win-Test doesn't open the RTTY window(s) automatically. From the Win-Test menu, select Windows | RTTY(radio 1). This will open the RTTY receive window for Radio 1.
If you're running SO2R RTTY, select Windows | RTTY(radio 2), which will open a second RTTY receive window for Radio 2.
Highlight colors:
- Blue
- New callsigns
- Yellow
- New multipliers
- Green
- New double-multipliers
- Red
- Duplicate callsigns (dupes)
Your own transmissions will be displayed in blue text.
With the mouse cursor, you can double-click (or single-click, if the option is enabled) on a callsign, and it will be copied to the callsign entry field in the logging window. Remember that pressing [Insert] when the callsign entry field is empty will copy the most recently highlighted callsign into the callsign field. Clicking on a contest exchange will copy it into the received exchange field. Middle-clicking on a callsign (click on mouse wheel) will transfer the call to the Partner window / callsign stack.
Context Menu
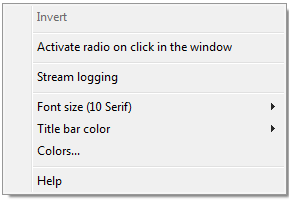
Right-click of the mouse brings up a context menu, containing the INVERT feature. This feature allows you to invert (change from baudot characters to figures) selected text. First select the text to be inverted with the left mouse button and then hit the right mouse button and INVERT the text. Thus TOO QWE will become 599 123.
Stream Logging will - when enabled - log all RTTY RX and TX traffic to an ASCII file named {filename}.ry1 for the RTTY Window 1 and {filename}.ry2 for RTTY Window 2. This is usefule for later review of potentially broken QSOs.
Function Keys
Most of the function keys have a corresponding button at the bottom of the RTTY window which you may click with the mouse to activate instead of using the keyboard. Clicking on a function key button while holding down the [Shift] key will allows you to reprogram the contents of a message button quickly. All RTTY messages may be edited at once via Options | RTTY | Modify standard messages ... or the text command shortcut MSGS [Enter].
Pressing the Alt+K button toggles in and out of keyboard mode so you can type and transmit any text real-time.
Pressing the (C) button clears the TX/RX window.
To scroll text in the RTTY window, drag the scroll bar with the left mouse button, or turn the mouse wheel. [Shift] + mouse wheel will jump to the beginning or the end of the RTTY window.
Most routine situations in RTTY contests can be handled with the mouse alone, without pressing any key.
Defining messages
Most of the RTTY messages are already set up for you to use by default, but often you will want to change them. Use $13 in a message to send a Carriage Return (CR). See Message Variables for a complete list.
All RTTY messages may be edited at once via Options | RTTY | Modify standard messages ... or the text command shortcut MSGS [Enter].
You can also quickly edit a single message. To do this, press Shift-F1 .. F7, Shift-[Insert], or Shift-[+]. Note: if you're operating in SO2R mode with Shift Binds to Secondary Radio enabled, you must use the [AltGr] (or [Ctrl]+[Alt]) keys instead of the [Shift] key to reprogram messages.
As the ++ and -- speed accelerators used for CW do not make sense on RTTY, you should remove them.
Once you're done, click Validate to close the window.
Please see the Configuring CW/RTTY messages page for more details.
MMTTY window
You may occasionally encounter a problem with the cursor disappearing or the application loses focus. To recover, minimize and restore Win-Test using the mouse.
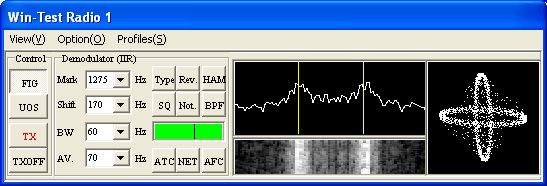
The above screenshot is of the MMTTY window in normal mode when operating RTTY. This is when Only show FFT spectrum, waterfall and XY scope is disabled.
This is a mimimized version of MMTTY, but it allows you to change most of the settings. For example, to enable the XY scope (the two ellipsoides) go to the View menu of MMTTY and tick the XYScope option. For the rest of the bells and whistles of MMTTY, please see the online help of that software.
See also
- microHAM Logger Setup Guides
- Getting Started on RTTY - very detailed MMTTY set-up guide by AA5AU
- Getting ready for a RTTY Contest
- Setting up an Kenwood TS-850S with the microHAM microKeyer
- RTTY Contesting.com: Great tutorials on how to use MMTTY.
