Difference between revisions of "Menu:Tools"
| Line 15: | Line 15: | ||
You may want to use the text commands '''<tt>NORPT</tt>''' or '''<tt>RPT</tt>''' to deactivate and later reactivate that function. | You may want to use the text commands '''<tt>NORPT</tt>''' or '''<tt>RPT</tt>''' to deactivate and later reactivate that function. | ||
Optionally, you may chose that only the Escape key deactivates the repeat function by clicking the appropriate option in the context menu | Optionally, you may chose that only the Escape key deactivates the repeat function by clicking the appropriate option in the context menu | ||
| − | or by '''<tt>RPTESCONLY</tt>''' and '''<tt> | + | or by '''<tt>RPTESCONLY</tt>''' and '''<tt>NORPTESCONLY</tt>''' text commands. |
==Intelligent Quick QSL...== | ==Intelligent Quick QSL...== | ||
Revision as of 18:43, 15 August 2013
Menu:Tools
Automatic CQ repeat
Use the text command RPTDELAY to get to this menu quickly.
This option allows you to automatically repeat messages after a certain amount of time if no key was pressed by the operator. This feature works on all modes and simulates the operator pressing one of the keys [F1] to [F7] key after so and so many seconds.
Traditionally, this is used for the [F1] key to auto-repeat CQ but it can also beused on other keys.
Contrary to CW operation, note that when using an external voice keyer on SSB (like the built-in DRU-2 in a Kenwood TS-850) Win-Test does not know when the message ends. For this reason, the time period to be set is the time that elapses between two CQ calls. This is also true for RTTY when using the MMTTY plug-in.
You may want to use the text commands NORPT or RPT to deactivate and later reactivate that function. Optionally, you may chose that only the Escape key deactivates the repeat function by clicking the appropriate option in the context menu or by RPTESCONLY and NORPTESCONLY text commands.
Intelligent Quick QSL...
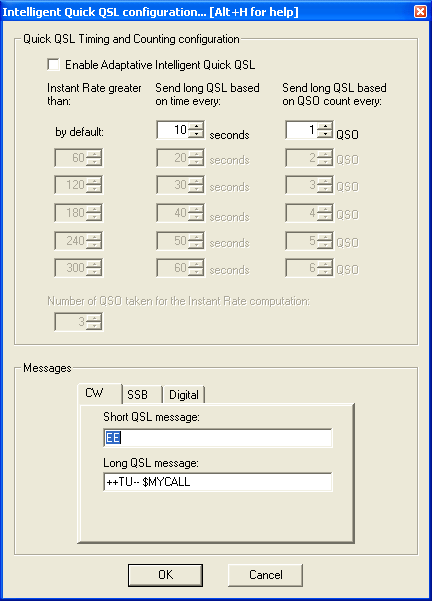
Use the text command QUICKQSL to get to this menu quickly.
This option controls the content of the two message variables $QQSLT and $QQSLC. When used, these variables change their content after so and so many seconds or when a number of QSOs have been logged. That way you can send a short QSL message to confirm the QSO in a pileup, but make sure your full callsign gets transmitted automatically every 2 minutes or every 5 QSOs only. So while most QSOs would be completed with TU or EE sometimes we would send a message like TU F5MZN.
A timer ($QQSLT macro) or a counter ($QQSLC macro) are associated with these macros to determine if either a short or a long QSL message is to be transmitted. Additionally, this feature can be related to the current QSO rate (so-called adaptive intelligent quick QSL).
The $QQSLC and $QQSLT macros can either be used in the CW/RTTY Messages or in the advanced SO2R scenarios. It is also possible to use the feature in SSB (SO1R and SO2R not avanced) but this needs a specific configuration in the SSB tab of the configuration window.
In the PLUS message in the Standard CW messages configuration, replace TU $MYCALL with $QQSLC or $QQSLT. Intelligent Quick QSL will then send a short QSL message or a long QSL message according to the set counter or the set timer in the respective variable.
The macro $QQSLRESET resets the timer or the counter like if the long QSL message were just sent. It makes sense to use this macro in each message you send your callsign in like CQ (F1) or MYCALL (F4). That way, you won't send a long QSL message after just having sent your call a few seconds before.
Redefine keyboard keys
Use the text command DEFINEKEYS to get to this menu quickly.
On some keyboards, it is difficult to reach specific keys, so Win-Test allows you to re-define some of the keys on your keyboard.
For example, to make the period key [.] call CQ, just like [F1]:
- Press the [Add] button
- Press the key you want to reprogram: the period key [.]
- Press the key that does the function you want: the [F1] key
- Press the [OK] button to save the changes, or press the [Esc] key to exit without saving any changes
To restore a remapped key to its default behavior, highlight a line by clicking on it with the mouse, then press the [Delete] button.
Remapping is done on a 1:1 basis. One keystroke becomes an alternate version of another. The original key still works as before. Keyboard remapping is saved in the wt.ini file, so the same map will automatically be used for all contests.
WARNING: Do not copy wt.ini from one machine to a new machine that already has a registered version of Win-Test, or else will have to re-enter the registration key on the new machine. See registration instructions.
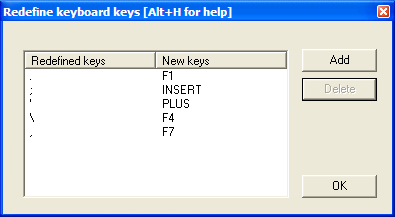
In the example above, you can see how the commonly-used keys like [F1], [Ins], and [+] have all been remapped to keys that are much easier to reach on a U.S. keyboard, especially if you are a touch-typist. The keyboard map shown in the example was developed by N6TV for Team Vertical:
- [.] (the period key) calls CQ, just like [F1]
- [;] (the semiclon key) sends the message, just like the [Ins] key
- ['] (the single-quote key) sends TU and logs the QSO, just like the [+] key
- [\] (the backslash key, just above the [Enter] key on many U.S. keyboards) sends $MYCALL, just like [F4]
- [,] (the comma key) sends a single question mark, just like [F7]
NOTE: Remapped keys are ignored in keyboard mode unless you enable the CW Option Remap keys in keyboard mode. It is generally a good idea to enable this option so that all message keys work the same, whether you are in keyboard mode or not.
Remapping [*] and [+] when using Notebook or Mini keyboard
By default, the asterisk key [*] is used to switch active radios, and the plus key [+] is used to send "TU" and log a QSO. These keys are located on the numeric keypad of a full-sized keyboard. Win-Test does not treat these keys the same as Shift-[*] and Shift-[+], which is what you would normally press when typing text.
If you are using a Notebook, Laptop or "mini" keyboard without a separate numeric keypad on the right side, equivalent keys with special colored symbols become active only when you press the [NumLock] key. One of these keys should be labeled with an asterisk in a different color, and another should be the plus. For example, on a U.S. ThinkPad keyboard, the colored asterisk may be located on the [P] key, and the colored plus may be shared with the [/] key. Those are the keys to use when remapping, after activating Num Lock mode.
For example, to make Ctrl-S act as the "Switch Active Radio" key when using a keyboard without a numeric keypad:
- Press the [Add] button
- Press [Ctrl-S]
- Press Shift-[NumLock] to enter Num Lock mode
- Press the key that does the function of the asterisk when in Num Lock mode, perhaps the letter P?
- Press Shift-[NumLock] again to exit Num Lock mode
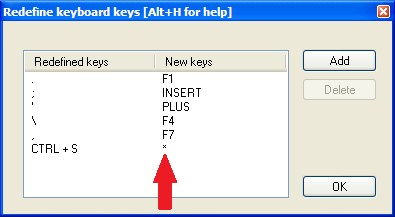
If a single asterisk * appears in the New Keys column as shown below, the key has been correctly defined. If it says Shift * or something else, it has not.
Data entry
These functions describe settings that influence data entry to the log entry line.
Exchange guessing
Exchange guessing is a feature of Win-Test that predicts the exchange that is going to be received before your QSO partner actually sends the report. In many contests a fixed piece of information is exchanged like the CQ zone in the CQWW contests, or ITU zone in IARU. This option allows you to select the way Win-Test fills in the exchange:
- pressing the space bar
- automatically
- after timeout
Note this option also acts on the various warnings (dupe, new mult, etc., if any) displayed under the log lines.
This feature saves you from continuously typing the same information over and over again but you better make yourself sure the guessed report is correct before you press the [Enter] key.
Please refer also to Setting up Exchange Guessing in Win-Test to know how to activate this feature for a specific contest.
Note: CQ zones in the USA and Russia will be guessed correctly (well, 99%) only when you have loaded F5IN's CTY_WT_MOD.DAT file. Otherwise Win-Test will always come up with the default zone of that country (5 for USA, 17 for UA9 and UA0). Please see Data files for more details on how to select the right CTY file.
Callsign check
On the fly callsign pattern check based on the K1TTT callsign.pat file, described here (over 400 rules applied today). The latest version of callsign.pat may be downloaded here.
Yellow text denotes a warning, red text denotes an invalid callsign.
Callsign pattern file location:
- Windows XP: C:\Documents and Settings\All Users\Application Data\Win-Test\extras\callsign.pat
- Windows Vista or Windows 7: C:\ProgramData\Win-Test\extras\callsign.pat
Updates may be downloaded from http://download.win-test.com/files/extra/.
You are encouraged to report to the author (K1TTT) any mistakes or updates needed in this file.
Priority
To change bands, you may wish to enter a frequency or band (m) into the callsign field. This option determines how these figures are to be understood by the program:
- Band - take 10,15,20,40,80,160 as a meter band
- Frequency - take the input as a frequency; shorted inputs as kHz
To make this a little more clear, if you enter 40:
- In the first case will switch the band to 40 meters (thus, enter 040 or 40.0 if you want to tune your radio to 040)
- In the second case it will tune your radio to decimal 040 on the current band (thus, enter 40M if you want to switch to 40 meters).
Enable ESM
Win Test v4 comes with an Enter Sends Message (ESM) feature, well-known by users of TR LOG by N6TR. The functionality can be turned on or off via this menue item or using the text commands ESM/NOESM.
ESM relies on the following messages assignation:
 F1: CQ
 F2: Sent report
 F4: Mycall
 F5: Logged callsign ($LOGGED)
 F7: ? (or "Again ?" in phone)
 INSERT: Callsign + sent report
 PLUS: TU + enter Q
The basic functionality of ESM can be described like this:
- Pressing [Enter] with an empty callsign field, will send the [F1] message.
- Pressing [Enter] with a callsign filled in but no report will send the [INSERT] message.
- Pressing [Enter] with callsign and report filled in will send the [PLUS] message.
- Pressing [Enter] with callsign and partial report filled in will send [F7] message.
It makes CW/RTTY easier, as you use one key for most of the operations instead of the various F keys.
There are additional minor details to ESM, which are not described here. On top, ESM behaviour is user-modifyable by using a script editor.
Once ESM is enabled, the [Enter] key can no longer be used to silently log a QSO. The key combination [Ctrl+Plus] has been introduced and added for this purpose.
When using the SO2R advanced technique, the scenarios messages are used instead of the standard.
Disable CW cut numbers translation
Allows to completely disable Win-Test's intelligent translation of cut numbers like TTA to 001. Note that this translation is performed on a contest and worked station contextual basis. The equivalent text commands are CUTON and CUTOFF. Do not mix up with CUT/NOCUT that are reserved for CW cut numbers generation !
Remap Slash to /P
This option allows you to map "/" to "/P" for Field Day, VHF/UHF contests and DX pedition mode.
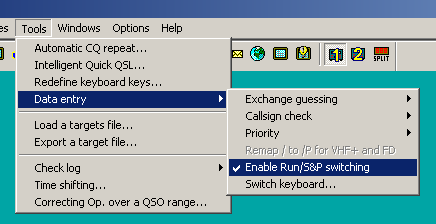
Enable Run/S&P switching
Allow switching between Run and Search & Pounce Operating Mode in order to have two different sets of CW/RTTY messages: one when running, and one when searching multipliers.
- The Run and S&P sets of messages are editable in the "Messages" Tab of the Standard CW/RTTY Messages Configuration window.
- Use [Ctrl-tab] to switch between RUN and S&P mode on the Primary Radio. The current mode is shown in the clock window. To change the mode of the Secondary Radio Window, use either [Ctrl-Shift-tab] or a mouse click on the appropriate control in the Secondary Radio Window.
- It is possible to configure WT to automatically populate the Band Map and wipe the data entry area whenever the operator changes the radio's frequency, if Search & Pounce mode is activated on that radio. This can be configured from the Band Map Properties dialog (right click in the Band Map window).
Note: Search & Pounce is not activated by default. To automatically populate the Band Map, you must switch to S&P mode.
Note: When switching from Run to S&P mode, Auto CQ and Auto CW Sending are automatically disabled.
Switch keyboard...
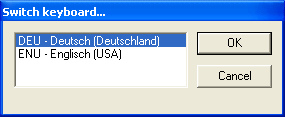
Keyboard switching for international teams with different keyboards. It is enabled only if several keyboards are installed on your system. You can also access this dialog by entering the text commands KEYBOARD or KEYB for short.
Scripts Manager
Allows to edit, create, delete or rename scripts. It's also used to assign a key and/or an argument to a script. Scripts are to be created and maintained by the user using the Lua programming language. See the Win-test Lua API. For a reference of the Lua programming language, see http://www.lua.org/manual/5.1/. Sample Lua scripts demonstrating how to control the RIT and internal DVR (voice keyer) of the Elecraft K3 and other radios may be downloaded from http://bit.ly/wtscripts.
You may also use the text command SCRIPTS to open the scripts manager.
Introduction
The Win-Test scripting language gives the user the unique ability to achieve dynamic tasks in Win-Test. It also provides a way to share your work with other Win-Test users who don't have time or skill to write their own scripts.
ESM (Enter Sends Message) was the first Win-Test application where the scripting language Lua was used. The ESM function itself is a Lua script, embedded in Win-Test (not modifiable). But, it has been designed to be totally overridden by a user-written script if desired, i.e., you can write and use you own modified version of the ESM script to change the default ESM actions. See ESM Script (embedded into Win-Test) for the LUA source code.
To do this, the minimum requirement is to know some basics of a programming language. The Lua syntax is very simple for doing easy tasks. If you're comfortable with any programming language, you will learn Lua in minutes, at least for basic scripting involved in Win-Test. Many Win-Test API (Application Programming Interface) functions are provided to control various Win-Test features.
For a list of Win-Test API Functions and Constants, see API.
# Notation
Scripts can either by called by pressing a key or from within a CW or RTTY message. For this, you must use the #SCRIPTNAME(ARGUMENT) notation. The argument (and parenthesis) are optional. The script will be called synchronously, but is executed in the main thread, meaning that it is not blocking the CW/RTTY stream.
For example :
TU N6TV #CLEARRIT
assuming your script is called CLEARRIT.wts - or
TU #QSYUP(200)
assuming you created a script named QSYUP.wts to QSY up wtArgument Hz after a QSO.
Calling Scripts via Text Command
Scripts may be triggered using a Text Command. SCRIPT.wts can be executed by entering SCRIPT in the callsign field.
An argument can be passed to the script by expanding it with a slash. SCRIPT/5 will call SCRIPT.wts and pass the parameter "5" in the wtArg global variable. The argument is always passed as a string when the script is called from a text command. If no argument is specified, the default argument defined in the script manager will be used (if any).
Synchronous vs. asynchronous - the #@ Notation
The scripts calls in the CW or RTTY messages are synchronous to the CW or the RTTY streams. To execute them asynchronously, they can be called with the #@ notation. Example:
-- script.wts
wtApp:AlertBox("Hello World!");
and the CW/RTTY message content is:
AAA #SCRIPT BBB
The keyer sends AAA, then "waits" until the user hits the OK button in the "Hello World!" alert box to send BBB. If the CW/RTTY message content is:
AAA #@SCRIPT BBB
The keyer sends AAA and starts the script (and the alert box is open), but it continues to key the rest of the message ("BBB") without waiting the user intervention. This is the asynchronous mode.
Tips for Programming
- Use the Scripts Manager to manage scripts, using a simple editor like Notepad. The scripts are stored in the {AppData}/All Users/Win-Test/scripts/ directory.
- Before you can press the Edit button, make sure you have configured an ASCII editor in the Options Menu
- If you wish to replace the built-in ESM script in Win-Test, save your script as "esm.wts". The value returned by your script will tell Win-Test what to do after it is executed:
- If the return value is 0 (or if there is no return value), WT will run its own embedded script after yours.
- If the return value is 1, WT will continue the Enter key process, without calling its embedded script.
- And if the return value is -1, WT will stop the Enter key process, without calling its embedded script.
- WT maintains two different QSO status: One for each radio. They are automatically cleared when the QSO is entered, if the operating mode (RUN/S&P) is switched or if the wtQso:ClearStatus() is executed.
- Lua global variables are persistent between scripts calls. If you don't want this behavior, use local variables instead (keyword local).
Basic Examples
Example 1
  -- esm.wts
  wtApp:AlertBox("Enter key ! ESM rulez...");
  return 0; -- This line can be omitted
  -- end
No return value (or 0) => WT will execute this script (the alert box will be displayed), and the embedded script will be called after it.
Example 2
  -- esm.wts
  wtApp:AlertBox("Enter key ! The key is processed by WT");
  return 1;
  -- end
The return value is 1 => After executing the script (the alert box will be displayed), WT will continue its own process and act exactly as if someone hit Enter. Read: It silently enters the QSO if it is OK. The embedded ESM script is ignored.
Example 3
  -- esm.wts
  wtApp:AlertBox("Enter key ! The key processing is stopped");
  return -1;
  -- end
The return value is -1 => After executing the script (the alert box will be displayed), the embedded ESM script is ignored and WT will also ignore the Enter key process (no QSO is entered).
For a collection of more advanced programming examples please see user contributed scripts and advanced programming examples.
Load a target file
This option allows you to load a so-called target file - an ASCII file (maybe self-generated) that has QSO and multiplier targets for each hour of the contest. This is a nice way to integrate a plan into your contest environment to keep yourself motivated. In the old days we used to have a piece of paper on the wall - today Win-Test automatically tracks this information for your convenience.
Before you can load a target file you will have to create one or receive one from somebody else. Please see Export a target file on how to do that.
The content of the target file becomes visible in the statistics window (see Statistics) when you compare current standings with the values in the target file.
Loading a target file is usually a Pre-contest configuration task. Please refer to the usual Pre-contest configuration activities chapter in this manual.
A target file can also be loaded at any time during the contest. If you see your target score was too easy, you can load a new target to keep your motivation high. You set a target to break your national record, and now things go better and you see the possibility to break the continental record. How can you track this new situation? Preparing more than one file with different targets is a good practice: if conditions change then simply load the new target file and WT will show you how you are doing against that new target!
Export a target file
This option allows you to create a target file from the log file currently loaded. It is useful to use last year's log as a start to create a target for this year's contest.
You should give a title to the target file to make clear what you're comparing to. Maybe you will want to change the target file to a more optimistic one when you'll realize band conditions are so great this time!
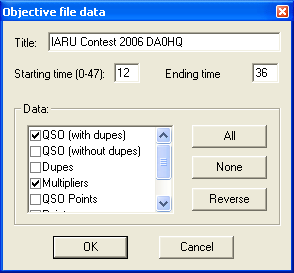
You may want to select which time frame to export (Starting time, ending time). Hours on Sunday have to be given in time + 24 hours so that 12:00 UTC on Sunday becomes 36.
Next you have to choose which columns to export to the target file. Normally you will want QSO count (with or without dupes), multipliers and points.
After pressing OK a file with the extension .obf will be created which will look similar to the file below:
#
# Target file generated by Win-Test
#
# VERSION 100
#
TITLE IARU Contest 2006 DA0HQ
START = 12
END = 36
12 QSO = 0 MULT = 0 POINTS = 0
13 QSO = 1 MULT = 1 POINTS = 1
14 QSO = 1 MULT = 1 POINTS = 1
15 QSO = 1 MULT = 1 POINTS = 1
16 QSO = 1 MULT = 1 POINTS = 1
17 QSO = 2 MULT = 2 POINTS = 4
18 QSO = 3 MULT = 2 POINTS = 4
19 QSO = 4 MULT = 2 POINTS = 6
20 QSO = 4 MULT = 2 POINTS = 6
21 QSO = 4 MULT = 2 POINTS = 6
22 QSO = 8 MULT = 3 POINTS = 18
23 QSO = 8 MULT = 3 POINTS = 18
24 QSO = 8 MULT = 3 POINTS = 18
25 QSO = 8 MULT = 3 POINTS = 18
26 QSO = 8 MULT = 3 POINTS = 18
27 QSO = 8 MULT = 3 POINTS = 18
28 QSO = 8 MULT = 3 POINTS = 18
29 QSO = 8 MULT = 3 POINTS = 18
30 QSO = 8 MULT = 3 POINTS = 18
31 QSO = 8 MULT = 3 POINTS = 18
32 QSO = 18 MULT = 3 POINTS = 21
33 QSO = 30 MULT = 5 POINTS = 45
34 QSO = 42 MULT = 5 POINTS = 50
35 QSO = 81 MULT = 7 POINTS = 224
As you can see the structure of the file is so easy to understand that you might want to use an ASCII editor to go and make some changes - or create it completely from scratch yourself using this template!
Check log
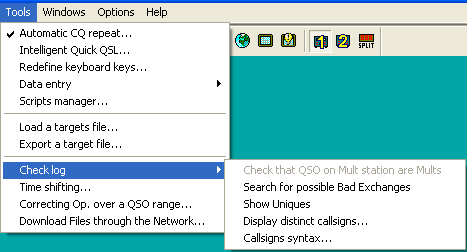
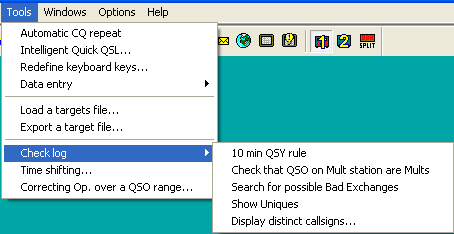
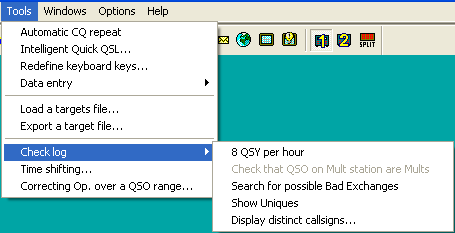
This tool allows you to verify if special restrictions of the contest rules have been adhered to in this log. You have different options, depending on the category you choose (see pictures below):
Depending on the selected contest category, you may check for:
- 8 QSY per Hour: Check the QSY count per hour (ARRL DX in M/2 category for example).
- 10 min QSY rule: Check if the minimum time on a band has been respected (Multiplier station in a M/S effort during a CQWW DX for example).
- Check that QSO on Mult station are Mults: Check if all QSOs made on the multiplier station are actually multipliers. You may want to quote the exceptions (if any) when sending your log to the contest sponsor to avoid massive score reductions.
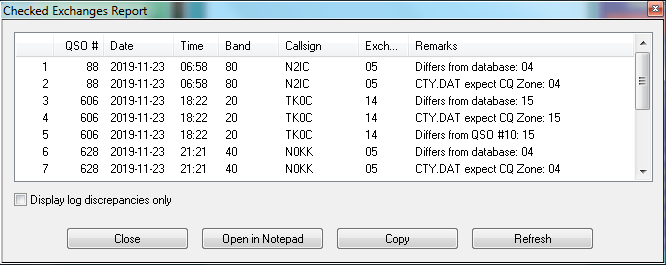
- Search for possible Bad Exchanges: Search the logged exchanges which are potentially bad, according to the database or to the other QSOs made with the same station during the contest. Works for CQWW, ARRL DX or any contest in which there is something which apparently is a zone. It also works for the VHF contest when a Gridsquare is logged.
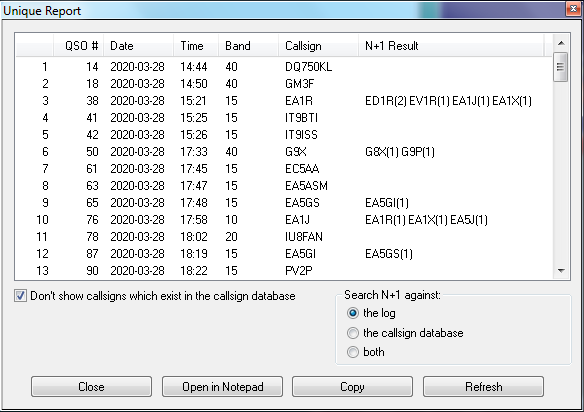
- Show Uniques: Search N+1 for each unique logged callsign in the log. A unique callsign is a callsign that appears in the log only once (contact only on one band and mode, and no dupe). N+1 can be searched against the log, the callsign database (Master database) or both. It is possible to switch off N+1 searching for unique callsigns which are known to the callsign database.
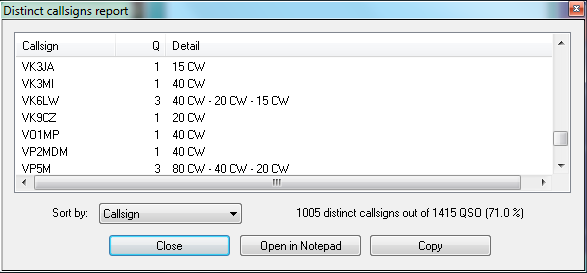
- Display distinct callsigns...: Display all distinct callsigns of a log, and band(s)/mode(s) worked by each station. You can sort this report by callsign, by number of Q and by country.
- Callsigns syntax...: Match the callsigns to the callsign pattern file (see Other_Files).
These are some of the typical reports you get:
You have the options of opening the report in a Notepad window for further processing. Additionally, you may press the Update button to create an updated report after you have done some changes to the log.
Time shifting
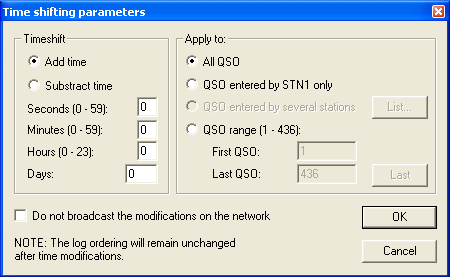
This option allows you to time shift selected QSOs by any amount of time - either positive or negative. It lets you correct a constant time offset (like you had set the wrong date on the computer, or the clock was off by one hour). You may consider to use this option after the contest to avoid heavy manual editing of many QSO's time through the use of Alt-F.
The time shift can be applied to the entire log or to a range of QSOs, to the QSOs entered by your own station (this could make sense in a multi operator environment), to QSOs entered by several stations. Note that in a multi operator environment, one station should always be (or should have been) defined as the time master to establish a common time base in the network.
Even though this tool is supposed to be used after a contest to correct a wrong clock setting, each time change will be broadcasted to all other stations of the network by default. You can disable this broadcasting — if not needed.
Note that time shifting is pretty CPU consuming. It may take quite some time for large logs, because each QSO modification requires several internal structures (mainly statistics) to be updated accordingly. Time shifting can not be cancelled while it is in progress, to avoid any log inconsistency.
Note: Wise users will create a backup of their log before using this option.
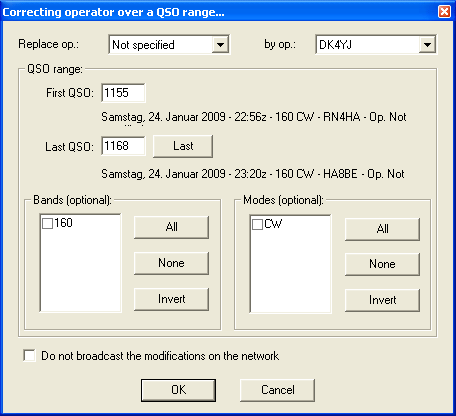
Correcting OP over a QSO range
This function lets you change (or add) the operator to a range of QSO. The QSOs are selectable by QSO number, by band, by mode or by callsign.
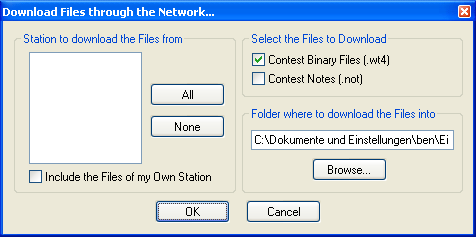
Download Files through the Network
To collect logs from different networked computers after a contest is over is the task of this function. Instead of having to visit each single computer, plug in the USB drive, copy the files over and move on to the next, this feature let's you collect the binary and notes files from all computers at once.

