Menu:Options
Menu:Options
Load contest at startup
Options | Load contest at startup
Enables or disables the automatic loading of the last contest file in use.
This command is useful to get on line again quickly if - for some reason - Win-Test
crashed or you had to quit the Win-Test in the middle of the contest.
If you like to switch to another file, close this file using
File | Close an then File | Open menu dialog.
Automatic backup...
Options | Automatic backup...
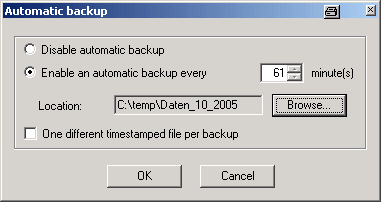
This function enables or disables the automatic backup of the .wtb file to another location, e.g. network drive or removable media like an USB stick. You can choose an automatic backup intervall between 1 and 120 minutes. If a backup fails, your are prompted if you wish to disable the backup.
Optionally a different (time-stamped) filename will be used for every new backup file (actually a good idea for backing up to a network drive!).
Here is some additional advice:
- Backups are processed in a separate thread, meaning that you will not even notice that a backup is in progress! No slowdown, no keyboard
blocking etc...
- Of course, it makes sense to backup to a different volume than your "working" drive. This avoids loss of everything if your hard disk
fails. Do not smile... It sometimes happens! (ARRL SSB 2002 FY5KE, IIRC!)
- Once you entered the last QSO, for safety, generate your Cabrillo log(s) before exiting. A simple "MAKELOG" command opens the appropriate dialog.
- In all cases, always make a copy of a file when you want to use/test/modify it. Always keep a backup, never use the original! If you have FTP access somewhere, copy the file there as soon as possible! If your computer crashes, you still will have a safe copy.
Call me paranoid, but believe me, you need to loose some day a very big chunk of data to understand the importance of backups!
Disable log synchronization on network
Options | Disable log synchronization on network
If checked, automatic log synchronization over the network (in multi/op environments) is disabled. May be useful under certain circumstances.
CW
Options | CW
This menu item allows you to control different aspects of CW operation.
No sound
Options | CW | No sound
If checked, no CW sound will be played through the internal speaker. This option is also available through the SOUND/NOSOUND text commands.
Initial Speed
Options | CW | Initial Speed
Sets the initial CW speed for new files.
Modify standard messages
Options | CW | Modify standard messages
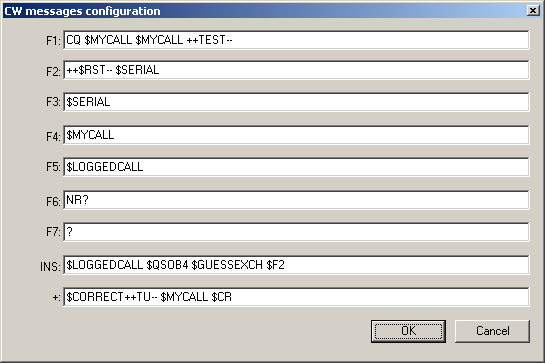
The place to change the CW messages.
Please have a look at the list of message variables you can use in the CW memories to control different aspects of the operation.
Modify additional messages
Options | CW | Modify additional messages
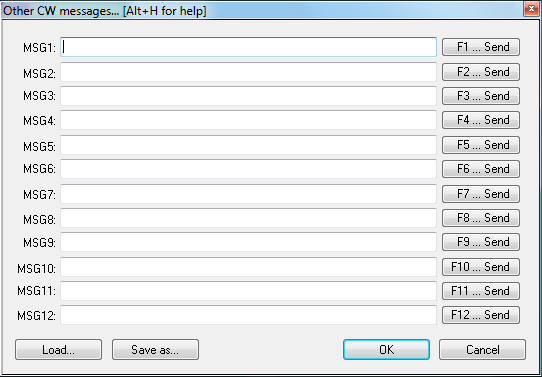
The place to create or modify additional CW messages which can be accessed using Alt-C. These memories can be used for transmitting QSL information, special greetings, QSY/sked information, ...
Serial number
Options | CW | Serial number
The leading zeros below 100 can be (or not) keyed by Win-Test, depending on the chosen option.
Similarly, there are 5 possible abbreviation levels for the serial numbers :
- Not abbreviated
- Half abbreviated : leading zeros are replaced by T.
- Abbreviated : The 0 and the 9 are shortened in T and N.
- Pro : The 0, 1, 4, 5 and 9 are shortened to T, A, V, E and N.
- Custom - there is a custom table. so each number can be shortened to a letter of your choice. Have fun!
By the way, this option affects serial numbers only, but never numbers in callsigns.
Correction
Options | CW | Correction
Controls the value of the $CORRECTED variable. See message variables for more information.
Shortened spaces (CT spaces)
Options | CW | Shortened spaces (CT spaces)
The standard spacing between CW words is 7 dits length, instead of 6 (known as "CT space"). With this option you can set it back to 6 dits if you want, achieving slightly shorter spacing between words. You can also use the new text commands CTSPACE and NOCTSPACE to set or reset it.
Auto sending...
Options | CW | Auto sending...
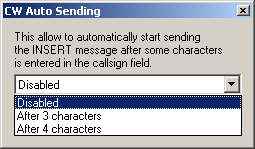
This allows to automatically start sending the [Insert] message after some characters are entered in the callsign field.
Hitting [Escape] when CW Auto Sending is enabled and the radio is on receive will disable Auto Sending for the current QSO. When you hit [Escape] during transmit will only stop the current transmission but not change the Auto Sending settings.
TODO: There is one other statement in the release notes, which I do not comprehend "...or if the caret is not in the callsign field.". Larry?
Configure interfaces...
Options | Configure interfaces...
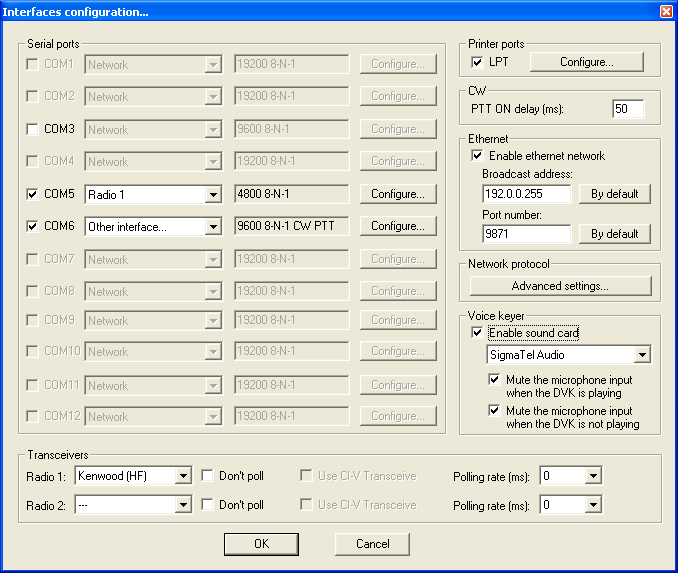
All the interfaces you wish to use with Win-Test can be parametered by using this dialog box.
Serial Ports
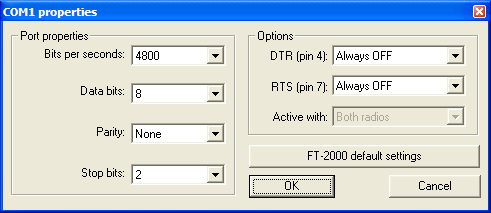
The serial ports can be used for the network (with crossed cables), for a connection to a packet radio controller, or for a RS232 radio interface. In that last case, you must specify what transceiver you are using. You also need to verify the port configuration:
The DTR(4)/RTS(7) pins can be controlled as
- Handshake
- PTT
- CW
- Always on
- Always off
- Active radio
Note: The pin numbering applies to a standard DB9 connector.
Transceivers
This region of the interfaces configuration window lets you select the type of transceiver for radio 1 and 2 plus various settings like polling, polling rate (actually, delay before polling the radio again after the previous sequence) and if the ICOM specific CI-V feature is to be used or not. By the way, when you use an ICOM radio with an address different from factory settings, please see WI.INI
Printer Ports
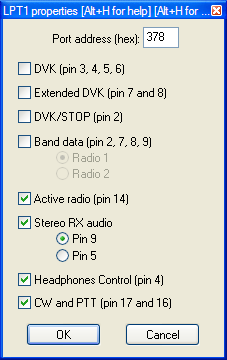
The parallel ports can only be used to interface the CW output from Win-Test via a classical interface. You just need to specify, in the dialog box, which radio is connected to the parallel port. More, the delay between the PTT command and the effective CW transmission is adjustable between 0 (QSK) to 1000 ms.
Ethernet
The Ethernet interface is used by the Win-Test's local area network, in a multi-operating environment. If needed, you can change the broadcast address and the port number used. If you ignore the meaning of these terms, note that there should normally be no need to modify the default values given by Win-Test. See Networking for more information.
Network Protocol Advanced Settings
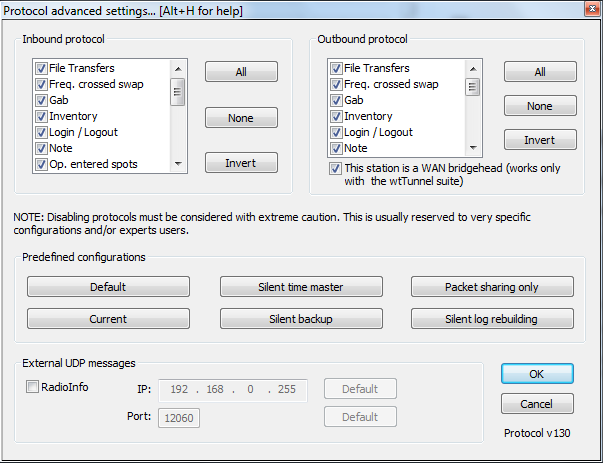
Under the Network Protocol Advanced Settings dialog you will find a way to restrict network traffic in a very specific way. CAUTION: Modifications to the default settings must be considered with an extreme attention. It is reserved for very particular configurations or purposes, mainly used by expert users. You're on your own!
Some pre-set typical configurations are available:
- Silent time master: Can be used if the computer is used to *only* distribute an accurate clock. It will not appear in the status window of the other networked computers.Note that no QSO will be recorded on (and sent from) this machine with this setting.
- Silent backup: Can be used if the computer is *only* used for this purpose. It will not appear in the status window of the other networked computers.
- Packet sharing: Can be used if stations are networked with different callsigns, do not want a common log, but want to share a commun packet stream. Can be used for several co-located single OP stations on VHF/UHF for example.
- Silent log rebuilding: Can be used if you need to rebuild from scratch a complete log from networked stations, without appearing in the status wnd of the other networked computers.
Not that in all settings, the station will be visible in the network with an INVENTORY command.
Voice Keyer
At last, if your computer has an embedded sound card, you can select and use it as a digital voice keyer by checking the appropriate box.
If you want to use a third-party software to record or modify voice messages, be sure to use the following file format : WAV, PCM, 8000 Hz sampling frequency, 1 channel (mono) and 16 bits per sample.
WinKey configuration...
Options | Winkey configuration...
TODO WinKey configuration
EZMaster configuration...
Options | EZMaster configuration...
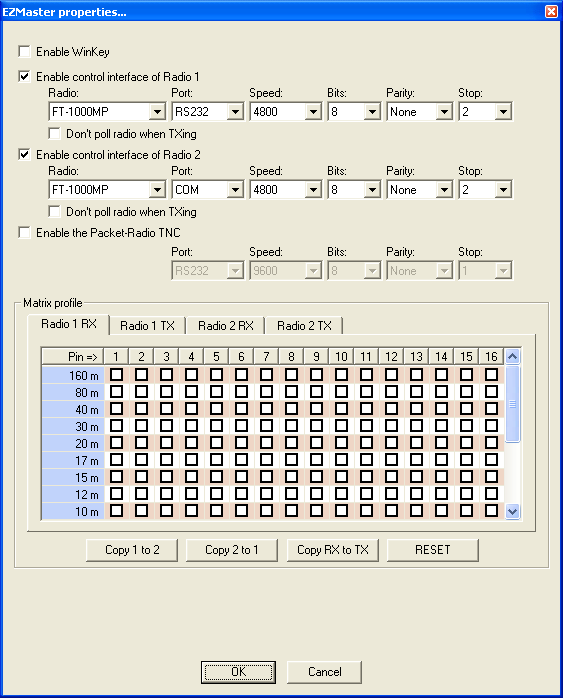
Advanced SO2R mode and setting up scenarios requires external SO2R control equipment of the last generation, communicating with Win-Test via a USB port.
This menu option enables the user to configure five different option for EZMaster to work with Win-test:
CW Keyer
Internal EZMaster CW Keyer (tick Enable WinKey Box) or Win-Test keyer (do not tick box).
Radio set-up
In the image below find configuration for FT1000MP
Packet-Radio TNC
Antenna configuration according to RX/TX
RTTY configuration...
Options | RTTY configuration...
This menu entry opens the control box for RTTY configuration.
Please refer to the RTTY chapter for all the details.
Log
Options | Log
Allows you to change the display of the log entry area (the last 9 QSOs plus the current QSO entry line). You may select font size, colors, headings and so on.
Spot Warnings
When this option is enabled, the DX cluster spots are briefly displayed (as soon as they arrive), in the line under below the log entry line. You can choose to display only the spots of the current band and/or the new multipliers, as well as your own callsign (good to know when you're being spotted!). And of course you may want to hide dupes and invalid callsigns.
DX Cluster
Options | DX Cluster
DX Cluster window shortcuts
This option controls the syntax of the DX-cluster used (DX Spider vs. AK1A, DXNet, etc.) and the count of spots and solar information requested by using the buttons in the DX cluster window.
Start/stop wtDxTelnet automatically
When wtDxTelnet is installed in the Win-Test directory, this option allows you to start and stop this application from within Win-Test or start and stop it automatically when Win-Test is launched.
HamCAP
Options | HamCAP
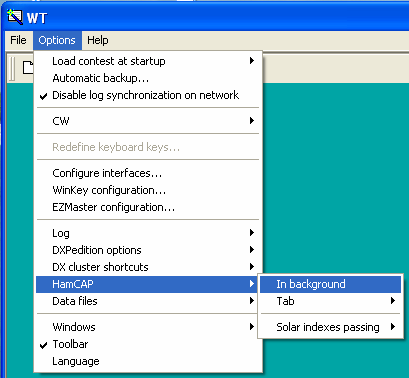
With this menu option you can configure the way Win-Test will integrate with HamCAP (by VE3NEA).
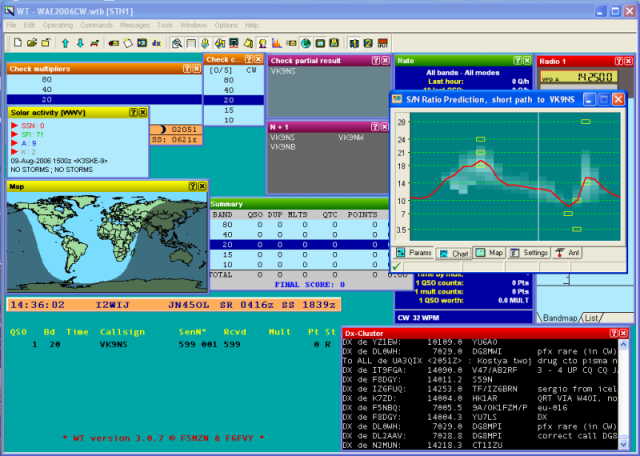
You can select if you want to see immediately the HamCAP window, as soon as you call for it with the shortcut Ctrl-P, or if you want it to calculate in background and you will recall the propagation forecast window later.
It is just a matter of taste and of how big is your monitor screen: if you have plenty of room, maybe you don't care to leave it in background (In background option checked), but in a visible part of the screen, so you don't loose the keyboard focus from the WT main window; otherwise you will see immediately HamCAP (In background option unchecked), and so you'll need to regain the focus with a mouse click.
Then you need to setup which HamCAP tab you want to see first.
The most useful are the Charts or the Map tab, which are those that give the propagation information, while the others, namely Params, Settings, and Antennas, are useful in the HamCAP itself setup phase.
See HamCAP in this manual for more details on the setup phase.
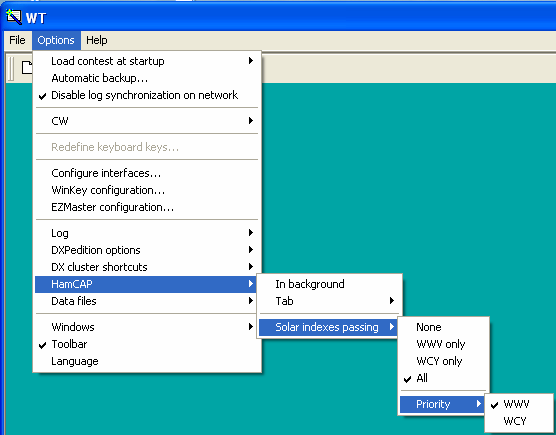
Then you have to setup in which way HamCAP has to deal with Solar figures (SSN, SFI, A and K indexes).
(See Menu Windows Solar_Activity in this manual).
HamCAP has at least three different modes of operation:
- stand-alone
- in cooperation with IonoProbe (by VE3NEA)
- feeded by a calling application (Win-Test)
So, at this time, you should check one of the following options:
- None, if you don't want, or need, Win-Test to pass any data to HamCAP, which will be working in stand-alone mode or in cooperation with IonoProbe;
- WWV only, or WCY only, if you want Win-Test to pass the corresponding Solar figures, if present, to HamCAP;
- All, and then choose Priority, if you want to try to use both figures and Win-Test to pass the prioritized one in case both data are present.
WAEDC
Options | WAEDC
Special option for the Worked All Europe DX Contest. This menu item is only visible when WAEDC Contest is selected.
For more information about Win-Test and WAEDC see WAEDC.
Data files
Options | Data Files
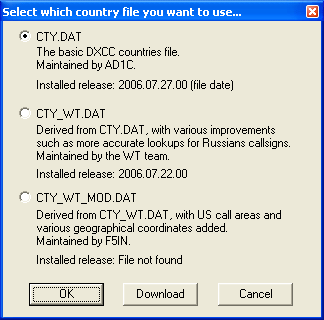
This option controls which CTY file to use. There are three to select from. You can even start an immediate download from the www.win-test.com web site.
Bandplans...
Options | Bandplans...
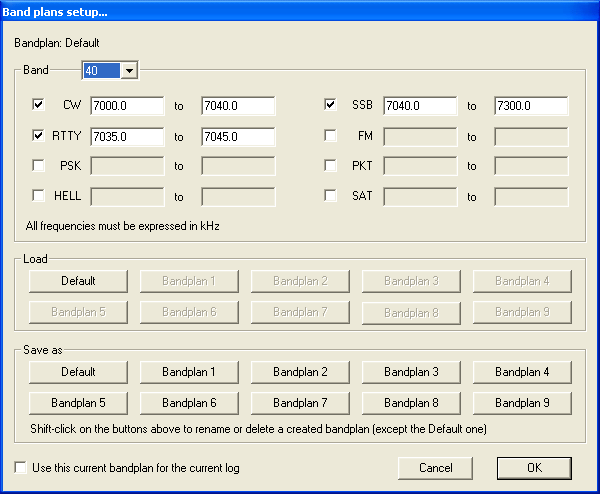
A flexible and powerful band plan management allows you to specify band boundaries on a permanent basis depending on the mode of operation. We all know, that on 40 m CW, the band goes up to 7100; on RTTY, the band goes from well below 7030 to 7100 etc. etc. Since Win-Test tries to filter incoming DX spots by frequency, this is the way to have Win-Test make the correct decision to drop the spot or display it as needed DX.
Different band plans can be saved and re-loaded at a later time. It's smart to create a band plan for SSB, another for CW, yet another one for 160 CW etc.
Windows
Options | Windows
The child windows of the application can either be included in the main Win-Test window, or floating, thus allowing the Windows desktop or other running software to remain visible. Please remember that, depending on your computer and/or operating system capabilities, you can have Win-Test windows on more than one screen.
See a practical example.
Toolbar
Options | Toolbar
If this option is checked, the Icons toobar is displayed below the menu.
Language
Options | Language
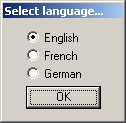
It is possible to choose the language of the Win-Test user interface. Currently supported languages are English, French and German.
Win-Test has to restart when the language is switched.
