Difference between revisions of "Menu:Commands"
| Line 1: | Line 1: | ||
| − | =QSY= | + | <big><big>Menu:Commands</big></big> |
| + | <!-- Adopted to Stylesheet DL6RAI --> | ||
| + | |||
| + | ==QSY== | ||
===One band up=== | ===One band up=== | ||
| − | Modify the band of the current QSO (logging field), to the nearest upper band (vs frequency). While on 10m, the nearest "upper band" will be 160m. | + | Modify the band of the current QSO (logging field), to the nearest upper band (vs frequency). While on 10m, the nearest "upper band" will be 160m. Shortcut: '''<tt>Alt-F1</tt>''' |
You can also directly type the desired band (if the logging field is empty, of course), and even a frequency in kHz (such as 14265). | You can also directly type the desired band (if the logging field is empty, of course), and even a frequency in kHz (such as 14265). | ||
===One band down=== | ===One band down=== | ||
| − | Modify the band of the current QSO (logging field), to the nearest lower band (vs frequency). While on 160m, the nearest "lower band" will be 10m. | + | Modify the band of the current QSO (logging field), to the nearest lower band (vs frequency). While on 160m, the nearest "lower band" will be 10m. Shortcut: '''<tt>Alt-F2</tt>''' |
You can also directly type the desired band (if the logging field is empty, of course), and even a frequency in kHz (such as 14265). | You can also directly type the desired band (if the logging field is empty, of course), and even a frequency in kHz (such as 14265). | ||
| − | =Keyboard mode= | + | ==Keyboard mode== |
Enabled only in CW mode (TODO: Keyboard mode also in RTTY?) | Enabled only in CW mode (TODO: Keyboard mode also in RTTY?) | ||
Allows to use the keyboard to play CW. | Allows to use the keyboard to play CW. | ||
| Line 16: | Line 19: | ||
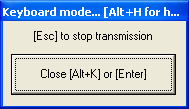
[[Image:keyboardmode.png|frame|center|Keyboard Mode]] | [[Image:keyboardmode.png|frame|center|Keyboard Mode]] | ||
| − | Keyboard mode can also be started with the shortcut | + | Keyboard mode can also be started with the shortcut '''<tt>Alt-K</tt>'''. |
| − | To exit this mode, click on the Stop button, or press Return or Escape, or | + | To exit this mode, click on the Stop button, or press ['''<tt>Return</tt>'''] or ['''<tt>Escape</tt>'''], or |
| − | press the shortcut | + | press the shortcut '''<tt>Alt-K</tt>''' again. |
| − | =CW Speed...= | + | ==CW Speed...== |
| − | Shortcut | + | Shortcut: '''<tt>Alt-V</tt>'''. |
Opens the CW speed dialog box: | Opens the CW speed dialog box: | ||
[[Image:cwspeed.png|frame|center|Entering the CW speed]] | [[Image:cwspeed.png|frame|center|Entering the CW speed]] | ||
| − | The CW-Speed can also changed via | + | The CW-Speed can also changed via '''<tt>Alt-F9</tt>''' (decreases by 2 WPM) and '''<tt>Alt-F10</tt>''' (increases by 2 WPM). |
| − | =CW | + | ==CW Weight...== |
| − | + | Open the CW weight dialog box: | |
[[Image:cwweight.png|frame|center|CW weight dialog box]] | [[Image:cwweight.png|frame|center|CW weight dialog box]] | ||
This is the weight of dashes to dots - the default value (3.0) should be fine for most people. | This is the weight of dashes to dots - the default value (3.0) should be fine for most people. | ||
| − | =Carrier= | + | ==Carrier== |
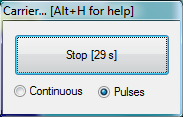
| − | Sends a carrier to the CW output. You can choose a plain carrier or pulses (in order to take care of the PA while tuning ...). Shortcut | + | Sends a carrier to the CW output. You can choose a plain carrier or pulses (in order to take care of the PA while tuning ...). Shortcut '''<tt>Ctrl-T</tt>''', or enter '''<tt>TUNE</tt>''' in the main window. |
[[Image:carrier.png|frame|center|Tuning carrier]] | [[Image:carrier.png|frame|center|Tuning carrier]] | ||
| − | To exit this mode, click on the Stop button, press Return or Escape. | + | To exit this mode, click on the Stop button, press ['''<tt>Return</tt>'''] or ['''<tt>Escape</tt>''']. |
| − | =Split frequency= | + | ==Split frequency== |
Allows to directly adjust the split frequency of the current radio. | Allows to directly adjust the split frequency of the current radio. | ||
[[Image:split.png|frame|center|Split frequency adjustments]] | [[Image:split.png|frame|center|Split frequency adjustments]] | ||
| − | A direct access to this dialog box is also possible by typing | + | A direct access to this dialog box is also possible by typing ['''<tt>Minus</tt>'''] from the numeric keypad, as well as the text command '''<tt>SPLITFREQ</tt>''' in the QSO logging field. |
| − | =QSY frequency= | + | ==QSY frequency== |
Allows you to adjust directly the QSY frequency on the current band. | Allows you to adjust directly the QSY frequency on the current band. | ||
[[Image:qsyfrequency.png|frame|center|QSY Frequency]] | [[Image:qsyfrequency.png|frame|center|QSY Frequency]] | ||
In the dialog box, you can also use and save the current frequency as a the QSY frequency, by clicking the central button. | In the dialog box, you can also use and save the current frequency as a the QSY frequency, by clicking the central button. | ||
| − | You can also have a direct access to this dialog box by using QSYFREQ or PASSFREQ text commands. | + | You can also have a direct access to this dialog box by using '''<tt>QSYFREQ</tt>''' or '''<tt>PASSFREQ</tt>''' text commands. |
This frequency will then appear in the status window. | This frequency will then appear in the status window. | ||
| − | =QSY to run frequency= | + | ==QSY to run frequency== |
| − | This command will bring | + | This command will bring you back to the last frequency on which you hit ['''<tt>F1</tt>'''] (=CQ, your last run frequency). |
| − | It is accessible with the shortcut | + | It is accessible with the shortcut '''<tt>Alt-F4</tt>'''. |
| − | =Swap the frequency on both radios= | + | ==Swap the frequency on both radios== |
TODO swap qrg on both radios | TODO swap qrg on both radios | ||
| − | =Take a sked= | + | ==Take a sked== |
| − | Shortcut | + | Shortcut '''<tt>Alt-E</tt>'''. |
To take a sked with a station, the following dialog box appears : | To take a sked with a station, the following dialog box appears : | ||
[[Image:takesked.png|frame|center|Taking a sked]] | [[Image:takesked.png|frame|center|Taking a sked]] | ||
| Line 67: | Line 70: | ||
Remark about the time of the sked : checking the "+ 24 h" box does not always mean that the sked will be taken for "tomorrow", but that the time must be shifted by + 24 hours. | Remark about the time of the sked : checking the "+ 24 h" box does not always mean that the sked will be taken for "tomorrow", but that the time must be shifted by + 24 hours. | ||
| − | Example 1 : It is | + | Example 1 : It is Saturday 1000z. You take a sked for Sunday 0600z : do not check the "+ 24 h" box. |
| − | Example 2 : It is | + | Example 2 : It is Saturday 0400z. You take a sked for Sunday 0600z : you must check the "+ 24 h" box, otherwise the sked will be taken for saturday 0600z ! |
=Pass a sstation= | =Pass a sstation= | ||
| − | Shortcut | + | Shortcut '''<tt>Alt-D</tt>'''. |
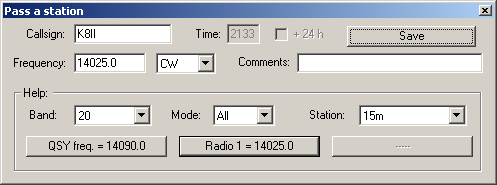
To pass a callsign to another operating position (multi operators), the following window appears : | To pass a callsign to another operating position (multi operators), the following window appears : | ||
[[Image:passstation.png|frame|center|Pass a station]] | [[Image:passstation.png|frame|center|Pass a station]] | ||
| − | You must write down the callsign of the station you want to pass (default : the | + | You must write down the callsign of the station you want to pass (default: the callsign in the logging field), the frequency, the mode (only during a multi mode contest), and an optional comment. Once OK is pressed, the infomation will appear in the skeds window. |
To make it easier passing a callsign in a multi operating environment, the lower part of window lets you know, by means of filters (combo box), what station is on the band where you wish the calling station to be, and the frequencies of the radios being on that band. | To make it easier passing a callsign in a multi operating environment, the lower part of window lets you know, by means of filters (combo box), what station is on the band where you wish the calling station to be, and the frequencies of the radios being on that band. | ||
| − | =Copy-paste the previous QSO= | + | ==Copy-paste the previous QSO== |
| − | Shortcut | + | Shortcut '''<tt>Alt-[UP]</tt>'''. |
This copies the callsing from previous QSO to the QSO edit field. Useful for passed stations or after QSY. | This copies the callsing from previous QSO to the QSO edit field. Useful for passed stations or after QSY. | ||
| − | =Receive QTC= | + | ==Receive QTC== |
| − | Shortcut | + | Shortcut '''<tt>Alt-L</tt>'''. |
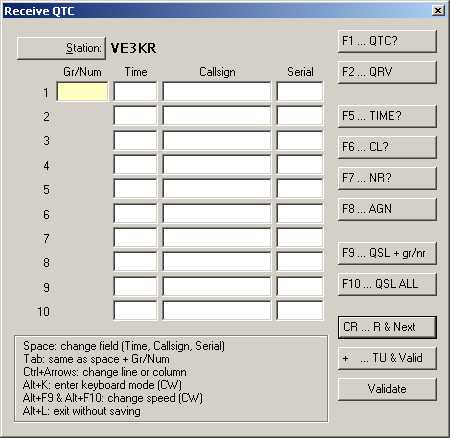
Only for WAE. Opens the QTC RX dialog box | Only for WAE. Opens the QTC RX dialog box | ||
[[Image:qtc-rx.gif|frame|center|QTC RX dialog]] | [[Image:qtc-rx.gif|frame|center|QTC RX dialog]] | ||
See [[WAEDC]] for more information. | See [[WAEDC]] for more information. | ||
| − | =DX-Cluster= | + | ==DX-Cluster== |
| − | Shortcut | + | Shortcut '''<tt>Alt-T</tt>'''. |
This window allows you to send commands to the DX cluster you are connected to. | This window allows you to send commands to the DX cluster you are connected to. | ||
[[Image:dxcluster.png|frame|center|Sending commands to the DX cluster]] | [[Image:dxcluster.png|frame|center|Sending commands to the DX cluster]] | ||
The buttons of the lower part of the window are direct commands that can be activated with your mouse. | The buttons of the lower part of the window are direct commands that can be activated with your mouse. | ||
| − | =Spot= | + | ==Spot== |
| − | Shortcut | + | Shortcut '''<tt>Alt-[F3]</tt>''' |
Sends, on the DX cluster where you are connected, a spot with the callsign of the current logged QSO. The frequency is the active frequency of the current radio, or the frequency on which the QSO was logged. | Sends, on the DX cluster where you are connected, a spot with the callsign of the current logged QSO. The frequency is the active frequency of the current radio, or the frequency on which the QSO was logged. | ||
[[Image:spotastation.png|frame|center|Spot a station]] | [[Image:spotastation.png|frame|center|Spot a station]] | ||
You can also modify the command (by adding a comment for example), before sending the spot. To cancel sending a spot, close the dialog box or press escape. | You can also modify the command (by adding a comment for example), before sending the spot. To cancel sending a spot, close the dialog box or press escape. | ||
| − | =Propagation forecast= | + | ==Propagation forecast== |
| − | Shortcut | + | Shortcut '''<tt>Ctrl-P</tt>'''. |
TODO prop forecast | TODO prop forecast | ||
| − | =Insert into BandMap= | + | ==Insert into BandMap== |
| − | Shortcut | + | Shortcut '''<tt>Ctrl-[Enter]</tt>'''. |
| − | Inserts - into the | + | Inserts - into the band map of the active radio - the callsign captured in the logging field. This is very useful, especially while hunting for multipliers, to quickly detect a station in the band when you turn the VFO knob. |
| − | =Active Radio= | + | ==Active Radio== |
Switches the active radio. A double-click on one of the VFOs of the corresponding Bandmap will provide the same result. The "*" key also swaps the 2 radios (useful for SO2R operation). | Switches the active radio. A double-click on one of the VFOs of the corresponding Bandmap will provide the same result. The "*" key also swaps the 2 radios (useful for SO2R operation). | ||
| − | =Station Type= | + | ==Station Type== |
Indicates the station type for the current QSO. This command is useful for multi operators set-ups (M/S or M/2). At the end of each QSO line, you can see : | Indicates the station type for the current QSO. This command is useful for multi operators set-ups (M/S or M/2). At the end of each QSO line, you can see : | ||
| Line 124: | Line 127: | ||
A SUPPORT station has the same settings than the MASTER station it refers to. It allows to have a RUN station, which runs the pile-up, and a RUN SUPPORT station (R+) which seeks for multiplier in the same band as the RUN station (usually called INBAND station). As well, there can also be several MULTI, RUN1 stations ... | A SUPPORT station has the same settings than the MASTER station it refers to. It allows to have a RUN station, which runs the pile-up, and a RUN SUPPORT station (R+) which seeks for multiplier in the same band as the RUN station (usually called INBAND station). As well, there can also be several MULTI, RUN1 stations ... | ||
| − | =CW Messages= | + | ==CW Messages== |
| − | Sends the CW messages <tt>F1</tt>...<tt>F7</tt>, <tt>Insert</tt> and <tt>+</tt>. | + | Sends the CW messages '''<tt>F1</tt>'''...'''<tt>F7</tt>''', '''<tt>[Insert]</tt>''' and '''<tt>[+]</tt>'''. |
See [[Keys#CW and SSB keyer|Keys]] for more information. | See [[Keys#CW and SSB keyer|Keys]] for more information. | ||
| − | You can also open the '''additional CW messages'''-dialog (You can even use the shortcut | + | You can also open the '''additional CW messages'''-dialog (You can even use the shortcut '''<tt>Alt-C</tt>''' this). |
| − | [[Image:cw-additional-messages.png|frame|center|Additional | + | [[Image:cw-additional-messages.png|frame|center|Additional CW messages dialog]] |
[[Menus|Back to Menus]] | [[Menus|Back to Menus]] | ||
Revision as of 21:58, 1 August 2006
Menu:Commands
QSY
One band up
Modify the band of the current QSO (logging field), to the nearest upper band (vs frequency). While on 10m, the nearest "upper band" will be 160m. Shortcut: Alt-F1
You can also directly type the desired band (if the logging field is empty, of course), and even a frequency in kHz (such as 14265).
One band down
Modify the band of the current QSO (logging field), to the nearest lower band (vs frequency). While on 160m, the nearest "lower band" will be 10m. Shortcut: Alt-F2
You can also directly type the desired band (if the logging field is empty, of course), and even a frequency in kHz (such as 14265).
Keyboard mode
Enabled only in CW mode (TODO: Keyboard mode also in RTTY?) Allows to use the keyboard to play CW.
Keyboard mode can also be started with the shortcut Alt-K. To exit this mode, click on the Stop button, or press [Return] or [Escape], or press the shortcut Alt-K again.
CW Speed...
Shortcut: Alt-V. Opens the CW speed dialog box:
The CW-Speed can also changed via Alt-F9 (decreases by 2 WPM) and Alt-F10 (increases by 2 WPM).
CW Weight...
Open the CW weight dialog box:
This is the weight of dashes to dots - the default value (3.0) should be fine for most people.
Carrier
Sends a carrier to the CW output. You can choose a plain carrier or pulses (in order to take care of the PA while tuning ...). Shortcut Ctrl-T, or enter TUNE in the main window.
To exit this mode, click on the Stop button, press [Return] or [Escape].
Split frequency
Allows to directly adjust the split frequency of the current radio.
A direct access to this dialog box is also possible by typing [Minus] from the numeric keypad, as well as the text command SPLITFREQ in the QSO logging field.
QSY frequency
Allows you to adjust directly the QSY frequency on the current band.
In the dialog box, you can also use and save the current frequency as a the QSY frequency, by clicking the central button.
You can also have a direct access to this dialog box by using QSYFREQ or PASSFREQ text commands.
This frequency will then appear in the status window.
QSY to run frequency
This command will bring you back to the last frequency on which you hit [F1] (=CQ, your last run frequency). It is accessible with the shortcut Alt-F4.
Swap the frequency on both radios
TODO swap qrg on both radios
Take a sked
Shortcut Alt-E. To take a sked with a station, the following dialog box appears :
You must write down the callsign of the station you want to take a sked with (the current callsign in the logging field will be taken by default), the time of the sked (possibly specifying if this time must shifted + 24h, see comment below), the frequency, the mode (only in a multi mode contest), and an optional comment. Once recorded, the sked will appear in the skeds window.
Remark about the time of the sked : checking the "+ 24 h" box does not always mean that the sked will be taken for "tomorrow", but that the time must be shifted by + 24 hours.
Example 1 : It is Saturday 1000z. You take a sked for Sunday 0600z : do not check the "+ 24 h" box.
Example 2 : It is Saturday 0400z. You take a sked for Sunday 0600z : you must check the "+ 24 h" box, otherwise the sked will be taken for saturday 0600z !
Pass a sstation
Shortcut Alt-D. To pass a callsign to another operating position (multi operators), the following window appears :
You must write down the callsign of the station you want to pass (default: the callsign in the logging field), the frequency, the mode (only during a multi mode contest), and an optional comment. Once OK is pressed, the infomation will appear in the skeds window.
To make it easier passing a callsign in a multi operating environment, the lower part of window lets you know, by means of filters (combo box), what station is on the band where you wish the calling station to be, and the frequencies of the radios being on that band.
Copy-paste the previous QSO
Shortcut Alt-[UP]. This copies the callsing from previous QSO to the QSO edit field. Useful for passed stations or after QSY.
Receive QTC
Shortcut Alt-L. Only for WAE. Opens the QTC RX dialog box
See WAEDC for more information.
DX-Cluster
Shortcut Alt-T. This window allows you to send commands to the DX cluster you are connected to.
The buttons of the lower part of the window are direct commands that can be activated with your mouse.
Spot
Shortcut Alt-[F3] Sends, on the DX cluster where you are connected, a spot with the callsign of the current logged QSO. The frequency is the active frequency of the current radio, or the frequency on which the QSO was logged.
You can also modify the command (by adding a comment for example), before sending the spot. To cancel sending a spot, close the dialog box or press escape.
Propagation forecast
Shortcut Ctrl-P. TODO prop forecast
Insert into BandMap
Shortcut Ctrl-[Enter]. Inserts - into the band map of the active radio - the callsign captured in the logging field. This is very useful, especially while hunting for multipliers, to quickly detect a station in the band when you turn the VFO knob.
Active Radio
Switches the active radio. A double-click on one of the VFOs of the corresponding Bandmap will provide the same result. The "*" key also swaps the 2 radios (useful for SO2R operation).
Station Type
Indicates the station type for the current QSO. This command is useful for multi operators set-ups (M/S or M/2). At the end of each QSO line, you can see :
- R : RUN
- M : MULTI
- R1 : RUN 1
- R2 : RUN 2
The + indicates if the station is a SUPPORT.
A SUPPORT station has the same settings than the MASTER station it refers to. It allows to have a RUN station, which runs the pile-up, and a RUN SUPPORT station (R+) which seeks for multiplier in the same band as the RUN station (usually called INBAND station). As well, there can also be several MULTI, RUN1 stations ...
CW Messages
Sends the CW messages F1...F7, [Insert] and [+]. See Keys for more information.
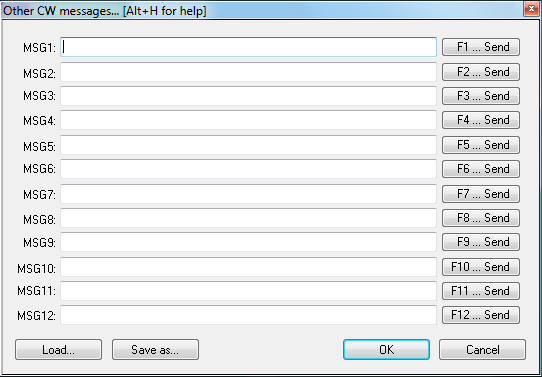
You can also open the additional CW messages-dialog (You can even use the shortcut Alt-C this).
