DX Cluster/Telnet
Connecting to a telnet cluster is the work of an external application provided as part of the Win-Test package called 'wtDxTelnet'.
This program maintains the connection to the cluster, NOT Win-Test itself!
This is a commonly asked question on the support reflector, hence the emphasis!
Configuring wtDxTelnet (single-op environment)
The reasoning behind using a separate program for maintaining a telnet connection was to be able to have only one connection in a multi-op environment, rather than having to connect every time on each individual machine in the shack!
Configuration of wtDxTelnet is not a hard process, and like everything else configuration-based in Win-Test, needs only to be done once. This section explains how to setup wtDxTelnet and Win-Test for use in a single-op environment (with wtDxTelnet and Win-Test applications both running on the same computer). There are further instructions on what has to be done in a multi-op environment below.
Configuring Win-Test for wtDxTelnet
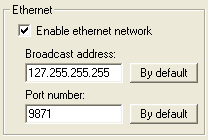
First, open the Configure Interfaces dialog in Win-Test via Options | Configure interfaces..., or type SETUP [Enter]. Check the box labeled Enable local network and ensure it looks like the following:
Enter the "loopback" broadcast IP address 127.255.255.255.
Pres [OK] and that is the only change of configuration you'll have to make to Win-Test itself.
Configuring wtDxTelnet
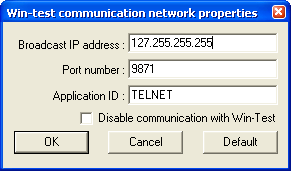
Now start wtDxTelnet (in Windows, Start|Programs|Win-Test|wtDxTelnet). From the menu select Options|Win-Test network properties and the screen should look like the following:
Use the same Broadcast address and Port number that you specified in Win-Test above.
These options may be greyed out by default, in which case be sure to uncheck the box labeled Disable communication with Win-Test, and then you can edit the values.
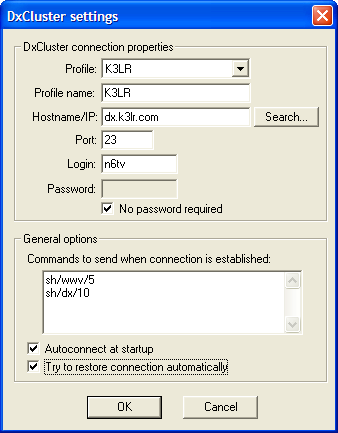
Next from the same menu choose Options|DxCluster properties. The screen should look something like this:
A quick description of the various settings here:
- Profile - Select
profile-1toprofile-10from the drop-down list to save settings for up to ten different DX Clusters - Profile name - You may change a profile name from the default name "profile-1" to something that is easier to remember, such as the node's callsign, by entering a new name here
- Hostname/IP - The host name (e.g. dx.k3lr.com, gb7djk.dxcluster.org, etc.) or the IP address of the DX cluster that you want to connect to. Press [Search...] to select from an alphabetical list of commonly-used DX Cluster nodes
- Port - The port number used by the DX cluster you wish to connect to. For an ordinary TELNET node, use 23. For DX Spider clusters (quite common nowadays), use 7300 or 8000. Be sure to select the same syntax in Win-Test using Menu:Options#DX_Cluster_window_shortcuts.
- Login - This is your callsign (what you would enter at the DX Cluster's Login: prompt)
- Password - The is a password (if required) to allow you to login to the cluster. Most do not require one, so just check the box labeled No password required
- Commands to send at connection - Use this to send commands such as sh/wwv/5 and sh/dx/10 when you first connect
- Autoconnect at startup - Check this to connect to the cluster automatically whenever you start wtDxTelnet
- Try to restore connection automatically - Check this to have wtDxTelnet restore this connection automatically if it detects that you have been disconnected (for whatever reason)
Press [OK] to save all changes.
Note that wtDxTelnet must always be running in the background if you want to stay connected to the cluster. To have wtDxTelnet started automatically by Win-Test, use Start/stop wtDxTelnet automatically, under Options | DX cluster in Win-Test.
Testing the configuration
Now you have setup both Win-Test and wtDxTelnet, it is time to ensure you can connect to the cluster, login fine and see spots coming through in Win-Test. Ensure that wtDxTelnet is connected to the cluster (you can see that in the main wtDxTelnet window) and if not, use the DxCluster|Connect menu option.
In Win-Test, open the DX cluster monitor window by going to the Windows|Dx-Cluster monitor menu option or using the Alt+O keyboard shortcut. You should immediately start seeing data coming through. Send a command to the cluster from Win-Test to ensure it is working - use the Commands|Dx-Cluster menu option or the Alt+T keyboard shortcut. Now send something like sh/dx/1 to get the most recent spot sent through. All being well, you should see the data in the cluster monitor window in Win-Test (and also in the wtDxTelnet window).
If you can see data coming through in the wtDxTelnet window, but not in Win-Test, please check the network settings in both Win-Test and wtDxTelnet (see above).
Configuring wtDxTelnet (multi-op environment)
The above guide covers setting up Win-Test and wtDxTelnet in a single-op environment and thankfully the only difference between the two configurations is the networking set-up in wtDxTelnet.
Obtaining your network broadcast address
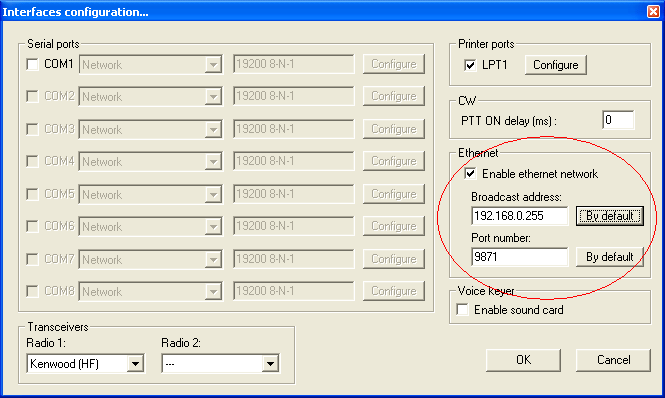
In order to configure wtDxTelnet correctly, you need to know the IP broadcast address you have set in Win-Test for the network. Simply open the Options|Configure interfaces dialog within Win-Test (or type SETUP [Enter]). Press the [By default] button to have Win-Test automatically calculate the broadcast address based on your PC's current IP address.
The broadcast address is found as follows:
So, in this above example, the broadcast address is 192.168.0.255. Use this same broadcast address and port number in wtDxTelnet and in other networked PCs.
Configuring wtDxTelnet
The advantage of wtDxTelnet in a multi-op environment is that you only require one connection to a DX cluster and the spots/data will be propagated across the entire network to all networked machines.
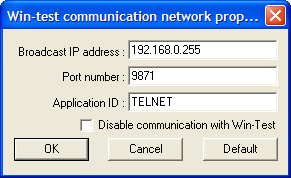
You can follow the steps above, for configuring wtDxTelnet in a single-op environment, but the network properties will be different. Goto the Options|Win-Test network properties menu in wtDxTelnet, and this time, use the following details:
- Broadcast IP address - it is very important that you get the address absolutely correct for the DX cluster data to be propagated across the network. It must match the broadcast address which you have specified in Win-Test's network properties in the step above. Using our above example, in this instance, the broadcast IP address would be 192.168.0.255. Just press the [Default] button shown above, and wtDxTelnet will calculate the same default broadcast address as Win-Test's [By default] button.
- Port number can usually be left as-is. Again, it must match what has been specified in Win-Test. The default port number is 9871, and use 9871 unless you have already changed the port number (and thus you should know what you're doing and thus you should know the port number).
- Application ID can also be left as TELNET.
Press [OK] and you have successfully configured both Win-Test and wtDxTelnet. You should now test the configuration.
Note that wtDxTelnet must always be running in the background if you want to stay connected to the cluster. To have wtDxTelnet started automatically by Win-Test, use Start/stop wtDxTelnet automatically, under Options | DX cluster in Win-Test.
