Difference between revisions of "DX Cluster/Packet"
m (→Connecting node: screenshots added) |
|||
| Line 1: | Line 1: | ||
== TNC pre-test == | == TNC pre-test == | ||
| − | Before you can use a TNC with Win-Test, it should tested | + | Before you can use a TNC with Win-Test, it should be tested first with a simple terminal program, not PAXON! Some TNC have different operating systems. Popularly are <tt>''"The Firmware"''</tt> (TF) and <tt>''"KISS"''</tt> mode. In Kiss mode, normally no connection is possible. I didn't find any successful way. If there is, please let me know. |
To make sure your TNC has the correct OS, use a simple terminal program, connect your TNC to a COM port, setting the right baud rate in the terminal program and switch on the TNC. | To make sure your TNC has the correct OS, use a simple terminal program, connect your TNC to a COM port, setting the right baud rate in the terminal program and switch on the TNC. | ||
If your TNC has the TF OS, after reset TNC a message should appear in the terminal program like <tt>"The Firmware Ver. 2.1.."</tt>. | If your TNC has the TF OS, after reset TNC a message should appear in the terminal program like <tt>"The Firmware Ver. 2.1.."</tt>. | ||
| − | If not, check cable and set-up. If the pre-test was successful, then set-up the TNC in Win-Test can be carried out | + | If not, check cable and set-up. If the pre-test was successful, then set-up the TNC in Win-Test it can now be carried out. |
== Win-Test TNC set-up == | == Win-Test TNC set-up == | ||
| Line 13: | Line 13: | ||
[[image:Config_TNC.jpg|center]] | [[image:Config_TNC.jpg|center]] | ||
| − | == Checking the set-up works == | + | == Checking that the set-up works == |
| − | To check | + | To check that the TNC set-up and connection is correct, open DX-Cluster monitor window (<tt>Alt+O</tt>). After resetting TNC, the same message should appear as before in the terminal program. If it doesn't work, set-up or cable is wrong. |
== Connecting node == | == Connecting node == | ||
| Line 28: | Line 28: | ||
Pressing ESC in DX-Cluster window is not possible, the window will close. | Pressing ESC in DX-Cluster window is not possible, the window will close. | ||
| − | To achieve | + | To achieve an '''ESC control''', you must press <tt>CTRL+E</tt> followed by the TNC command! |
| − | Check your call | + | Check your call sign first, whether this is stored in the TNC correctly. If not, no connection is possible. To check your call sign type in DX cluster window: <tt>CTRL+E I</tt> |
| − | You can see the TNC answer in the monitor window | + | You can see the TNC answer in the monitor window, e.g.: NO CALL or CALL DL8NAS. |
| − | If your call is wrong, type: <tt>CTRL+E I <call></tt> (<tt>CTRL+I DL8NAS</tt>) | + | If your call sign is wrong, type: <tt>CTRL+E I <call></tt> (<tt>CTRL+I DL8NAS</tt>) |
| − | After reset, TNC is normally in | + | After reset, TNC is normally in channel 0, no connection is possible, only viewing mode. The command to change to channel 1 is: <tt>CTRL+E S1</tt> |
Message in monitor window: <tt>CHANNEL NOT CONNECTED</tt> | Message in monitor window: <tt>CHANNEL NOT CONNECTED</tt> | ||
| Line 42: | Line 42: | ||
The connect command to your local node: <tt>CTRL+E C<node></tt> where <node> is the callsign of your local node. | The connect command to your local node: <tt>CTRL+E C<node></tt> where <node> is the callsign of your local node. | ||
| − | You can follow the connection in the DX-cluster monitor window. When connection is made, | + | You can follow the connection in the DX-cluster monitor window. When connection is made, then connect to your preferred DX-Cluster: |
It is important, that all commands after connecting are WITHOUT ESC! | It is important, that all commands after connecting are WITHOUT ESC! | ||
| − | These are normal inputs in the DX-cluster window | + | These are normal inputs in the DX-cluster window, e.g.: <tt>C DB0SDF-7</tt> where C is the connect command to your local node, to connect to the DX cluster DB0SDF-7. |
After connection to your preferred DX-cluster, you can use the buttons of the DX-CL window to show DX announcements. | After connection to your preferred DX-cluster, you can use the buttons of the DX-CL window to show DX announcements. | ||
| Line 50: | Line 50: | ||
You can use the packet monitor window (<tt>Alt+O</tt>) to check the connection status and to see data inbound from the TNC. Spots should begin filling up the bandmap at this stage. | You can use the packet monitor window (<tt>Alt+O</tt>) to check the connection status and to see data inbound from the TNC. Spots should begin filling up the bandmap at this stage. | ||
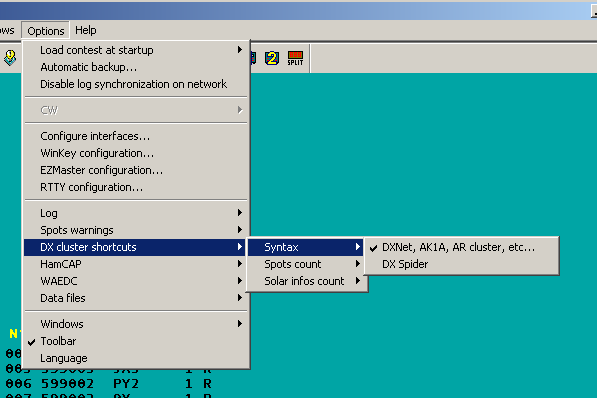
| − | If not DX announcements | + | If not DX announcements come into the window, check also DX-Cluster options set-up: |
[[Image:dx-cluster-syntax.png]] | [[Image:dx-cluster-syntax.png]] | ||
== Disconnecting node == | == Disconnecting node == | ||
| − | To leave the DX cluster, | + | To leave the DX cluster, use <tt>bye</tt> command in DX-Cluster window. After reconnect to your local node, TNC command <tt>CTRL+E D</tt> to disconnect from your local node. |
Other important TNC commands are: | Other important TNC commands are: | ||
| Line 61: | Line 61: | ||
<tt>CTRL+E T16</tt>: set TX delay, normally around 16 (12..20) | <tt>CTRL+E T16</tt>: set TX delay, normally around 16 (12..20) | ||
| − | A summary of TNC | + | A summary of TNC commands set with TF OS can be found here: [http://www.ralfzimmermann.de/tf26_2.html The Firmware TF 2.6 Commands] |
| − | + | Jul. 27. 06, DL8NAS, Sigi | |
| − | DL8NAS, Sigi | ||
== See also == | == See also == | ||
Revision as of 18:47, 27 July 2006
TNC pre-test
Before you can use a TNC with Win-Test, it should be tested first with a simple terminal program, not PAXON! Some TNC have different operating systems. Popularly are "The Firmware" (TF) and "KISS" mode. In Kiss mode, normally no connection is possible. I didn't find any successful way. If there is, please let me know.
To make sure your TNC has the correct OS, use a simple terminal program, connect your TNC to a COM port, setting the right baud rate in the terminal program and switch on the TNC. If your TNC has the TF OS, after reset TNC a message should appear in the terminal program like "The Firmware Ver. 2.1..". If not, check cable and set-up. If the pre-test was successful, then set-up the TNC in Win-Test it can now be carried out.
Win-Test TNC set-up
To set-up TNC, open menu - options - configure interfaces. Setting up the right COM port parameters, the same as before in terminal program.

Checking that the set-up works
To check that the TNC set-up and connection is correct, open DX-Cluster monitor window (Alt+O). After resetting TNC, the same message should appear as before in the terminal program. If it doesn't work, set-up or cable is wrong.
Connecting node
Once you have configured the appropriate COM port for your TNC in Win-Test, you should be able to connect to your local node.
Open DX cluster window by using Alt+T to send a command to the TNC.


To control the TNC, you need control sequences. TNC control sequences always starts with ESC!
Pressing ESC in DX-Cluster window is not possible, the window will close.
To achieve an ESC control, you must press CTRL+E followed by the TNC command!
Check your call sign first, whether this is stored in the TNC correctly. If not, no connection is possible. To check your call sign type in DX cluster window: CTRL+E I
You can see the TNC answer in the monitor window, e.g.: NO CALL or CALL DL8NAS.
If your call sign is wrong, type: CTRL+E I <call> (CTRL+I DL8NAS)
After reset, TNC is normally in channel 0, no connection is possible, only viewing mode. The command to change to channel 1 is: CTRL+E S1
Message in monitor window: CHANNEL NOT CONNECTED
The connect command to your local node: CTRL+E C<node> where <node> is the callsign of your local node.
You can follow the connection in the DX-cluster monitor window. When connection is made, then connect to your preferred DX-Cluster: It is important, that all commands after connecting are WITHOUT ESC! These are normal inputs in the DX-cluster window, e.g.: C DB0SDF-7 where C is the connect command to your local node, to connect to the DX cluster DB0SDF-7.
After connection to your preferred DX-cluster, you can use the buttons of the DX-CL window to show DX announcements.
You can use the packet monitor window (Alt+O) to check the connection status and to see data inbound from the TNC. Spots should begin filling up the bandmap at this stage.
If not DX announcements come into the window, check also DX-Cluster options set-up:

Disconnecting node
To leave the DX cluster, use bye command in DX-Cluster window. After reconnect to your local node, TNC command CTRL+E D to disconnect from your local node.
Other important TNC commands are:
CTRL+E T16: set TX delay, normally around 16 (12..20)
A summary of TNC commands set with TF OS can be found here: The Firmware TF 2.6 Commands
Jul. 27. 06, DL8NAS, Sigi