Difference between revisions of "HamCAP"
(First draw of the chapter) |
(HamCAP completed) |
||
| Line 8: | Line 8: | ||
If not done already, go to the [http://www.dxatlas.com/HamCap/| Ham CAP] web site, download and install this freeware package. | If not done already, go to the [http://www.dxatlas.com/HamCap/| Ham CAP] web site, download and install this freeware package. | ||
| − | HamCAP is quite easy to configure to suite for your needs and, if you follow the User's guide and Tutorial you can find at the end of this chapter, it will be | + | HamCAP is quite easy to configure to suite for your needs and, if you follow the User's guide and Tutorial you can find at the end of this chapter, it will be straightforward. |
| + | ==Set preferences== | ||
| + | |||
| + | Within the Settings TAB you can set the Latitude and Longitude coordinates of your QTH (the approximation to 1 degree is enough for our needs). | ||
| + | |||
| + | <b>Home</b> coordinates are essentials | ||
| + | to have the propagation forecast directly related to your QTH. | ||
| − | + | In this TAB you can also check the options related to | |
| + | what information you want to see in the <b>Chart</b> and in the <b>Map</b> TABs, | ||
| + | as well as the <b>Map Style</b> and <b>Map Resolution</b>, | ||
| + | to best suite your look and feel preferences. | ||
| − | |||
[[Image:HamCapSetting.png|frame|center|HamCAP Settings TAB]] | [[Image:HamCapSetting.png|frame|center|HamCAP Settings TAB]] | ||
| + | |||
| + | |||
| + | A setup like the one shown in the picture above is quite pleasant and profitable. | ||
| + | |||
| + | If you are using also IonoProbe, and want it to update the Solar parameters, | ||
| + | just press the <b>IonoProbe</b> button, and you are done; if this is the case, | ||
| + | you should set <b>None</b>, accordingly, in the [<b><code>Menu | Options | HamCAP | Solar Indexes passing</code></b>] parameters setting. See [[Menu:Options#HamCAP | Menu Options HamCAP]]. | ||
| + | |||
==Set Parameters== | ==Set Parameters== | ||
| + | |||
| + | Within the Params TAB you can set your trasmitting Power and to determine | ||
| + | whether you want the <b>Short Path</b> or <b>Long Path</b> propagation forecast. | ||
| + | |||
| + | |||
| + | You should also set the <b>SSN</b> (Sun Spot Number) value, which is useful if | ||
| + | HamCAP is working in Stand-alone mode, otherwise this value will be set by | ||
| + | IonoProbe or by Win-Test itself each time HamCAP will be invoked. | ||
| + | |||
[[Image:HamCapParams.png|frame|center|HamCAP Params TAB]] | [[Image:HamCapParams.png|frame|center|HamCAP Params TAB]] | ||
| − | + | ||
| + | Usually the <b>Month</b> is automatically set by HamCAP itself, and is related to the actual date; | ||
| + | this should usually be a don't care, unless you want to make a forecast | ||
| + | for the next CQWW six months ahead since today! | ||
| + | |||
| + | |||
| + | Also the <b>DX QTH</b> and <b>DX Call</b> are set by the call from Win-Test, | ||
| + | related to the callsign in the entry field for which | ||
| + | the '''<tt>ctrl-P</tt>''' has been invoked. | ||
| + | |||
| + | |||
| + | For the <b>Kp</b> value, as well the <b>Use Kp</b> checkbox, please refer to the HamCAP | ||
| + | documentation referenced at the end of this chapter; as a starting point, | ||
| + | these are almost a don't care as well. | ||
| + | |||
| + | |||
==Set TX and RX antennas== | ==Set TX and RX antennas== | ||
| + | |||
| + | Within the Ant TAB you should describe your antenna farm, in the <b>TX Antennas</b> frame, | ||
| + | and what you can presume, or you are interested in, for your correspondant in | ||
| + | the <b>RX Antennas</b> frame. | ||
| + | |||
| + | These information are used by HamCAP to calculate the estimated S/N ratio. | ||
| + | |||
| + | |||
[[Image:HamCapAnt.png|frame|center|HamCAP Ant TAB]] | [[Image:HamCapAnt.png|frame|center|HamCAP Ant TAB]] | ||
| − | + | ||
| + | Please refer to the HamCAP documentation, referenced below at the end of this chapter, | ||
| + | for a better understanding of this setup. | ||
| + | |||
Revision as of 14:11, 24 August 2006
HamCAP
Introduction
This chapter will give information and references to install and configure Ham CAP by VE3NEA to be used in conjunction with Win-Test.
If not done already, go to the Ham CAP web site, download and install this freeware package.
HamCAP is quite easy to configure to suite for your needs and, if you follow the User's guide and Tutorial you can find at the end of this chapter, it will be straightforward.
Set preferences
Within the Settings TAB you can set the Latitude and Longitude coordinates of your QTH (the approximation to 1 degree is enough for our needs).
Home coordinates are essentials to have the propagation forecast directly related to your QTH.
In this TAB you can also check the options related to what information you want to see in the Chart and in the Map TABs, as well as the Map Style and Map Resolution, to best suite your look and feel preferences.
A setup like the one shown in the picture above is quite pleasant and profitable.
If you are using also IonoProbe, and want it to update the Solar parameters,
just press the IonoProbe button, and you are done; if this is the case,
you should set None, accordingly, in the [Menu | Options | HamCAP | Solar Indexes passing] parameters setting. See Menu Options HamCAP.
Set Parameters
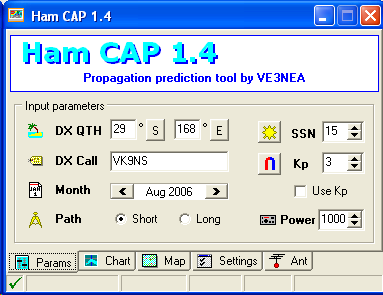
Within the Params TAB you can set your trasmitting Power and to determine whether you want the Short Path or Long Path propagation forecast.
You should also set the SSN (Sun Spot Number) value, which is useful if
HamCAP is working in Stand-alone mode, otherwise this value will be set by
IonoProbe or by Win-Test itself each time HamCAP will be invoked.
Usually the Month is automatically set by HamCAP itself, and is related to the actual date;
this should usually be a don't care, unless you want to make a forecast
for the next CQWW six months ahead since today!
Also the DX QTH and DX Call are set by the call from Win-Test,
related to the callsign in the entry field for which
the ctrl-P has been invoked.
For the Kp value, as well the Use Kp checkbox, please refer to the HamCAP
documentation referenced at the end of this chapter; as a starting point,
these are almost a don't care as well.
Set TX and RX antennas
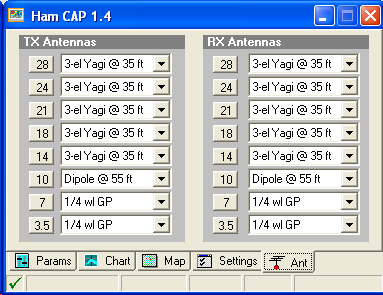
Within the Ant TAB you should describe your antenna farm, in the TX Antennas frame, and what you can presume, or you are interested in, for your correspondant in the RX Antennas frame.
These information are used by HamCAP to calculate the estimated S/N ratio.
Please refer to the HamCAP documentation, referenced below at the end of this chapter,
for a better understanding of this setup.
See Also
In the manual
External sources
Two very comprehensive guides:


