BestPractice7
Setting up a Yaesu FTDX-101
This article is a step by step approach describing how to set up an Yaesu FTDX-101 using the built-in USB interface. This article covers the set-up of RTTY in several steps.
Support for the Yaesu FTDX-101 was implemented WinTest 4.30. Be sure, you are running a current version of WinTest.
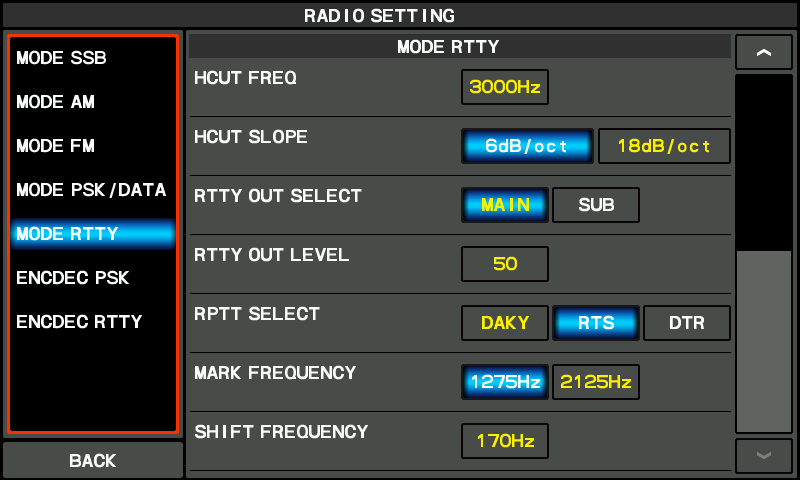
First set up the FTDX-101 for RTTY operation:
- Press the [FUNC] key
- Use touch and [MULTI] knob to select
- Press the [FUNC] key to save changes
- Press the [FUNC] key to exit the menu
Check and if necessary change these values
- RTTY OUT SELECT -> MAIN
- RPTT SELECT -> RTS
- POLARITY TX -> NOR
- MARK FREQUENCY -> 1275Hz
- SHIFT FREQUENCY -> 170Hz
Yaesu FTDX-101
- Download and install the Yaesu FTDX-101 driver FTDX101D/MP USB Driver (Virtual COM Port Driver) from the Yaesu Home Page on your computer. This driver will create virtual COM ports to control the radio and a virtual sound card.
- After installing the driver, you will find two new COM ports COM15 and COM16 on your computer. You need to change them (via the properties context menu) to lower numbers as MMTTY does not "see" these high COM ports. In this case COM3 and COM4 were free so these numbers were chosen, COM3 to be used for CAT control, COM4 for PTT and FSK keying.
MMTTY
- Download and Install MMTTY from here.
- Also download the EXTFSK package from there. The ZIP file you are looking for is named ExtFSK106.zip.
- Extract and copy ExtFSK.dll to the MMTTY directory. There is nothing else to do to install this software.
- Start MMTTY
- Activate the XY Scope by selecting the View(V) menu item and tagging XYScope
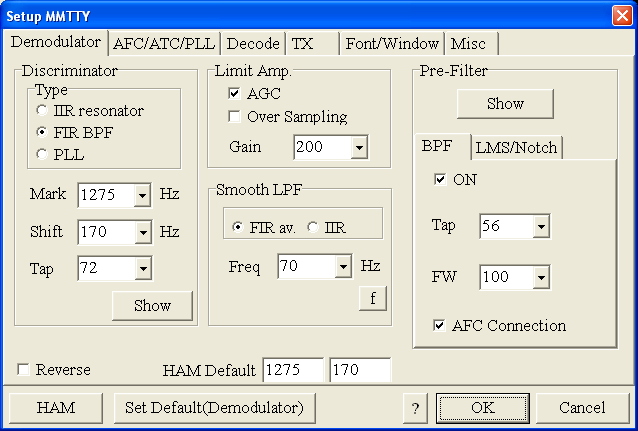
- Go to Option(O) | Setup MMTTY(O)...
- Select the Demodulator tab and set it up like in the picture below.
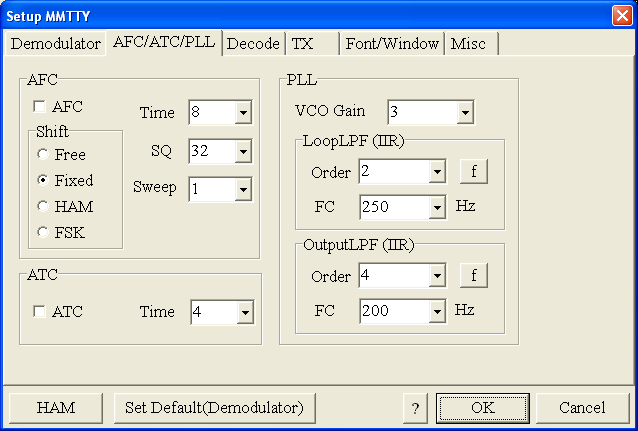
- Select the AFC/ATC/PLL tab and make sure AFC is OFF.
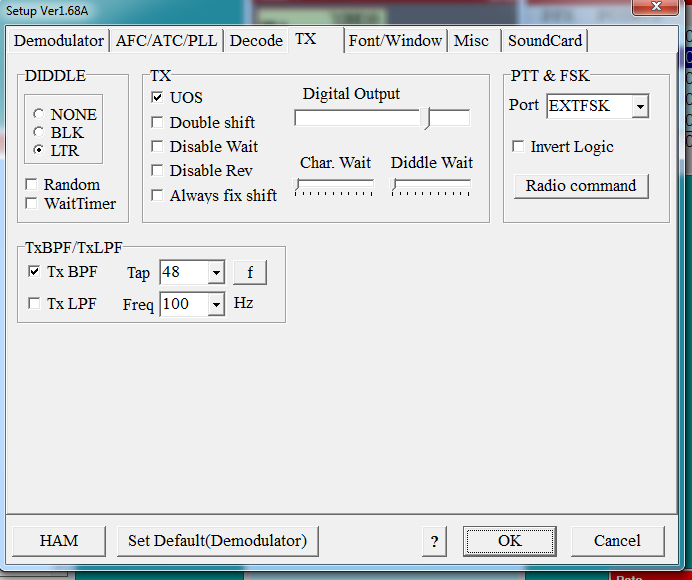
- Select the TX tab and switch PTT port to EXTFSK. The Radio Command button in this setup screen will allow you to control the radio from within MMTTY. This is not desired in this scenario so make sure it is not configured - otherwise Win-Test would not have access to the radio COM port later.
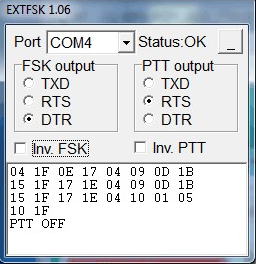
- Setup EXTFSK to key COM4, DTR is used for FSK, RTS is used for PTT.
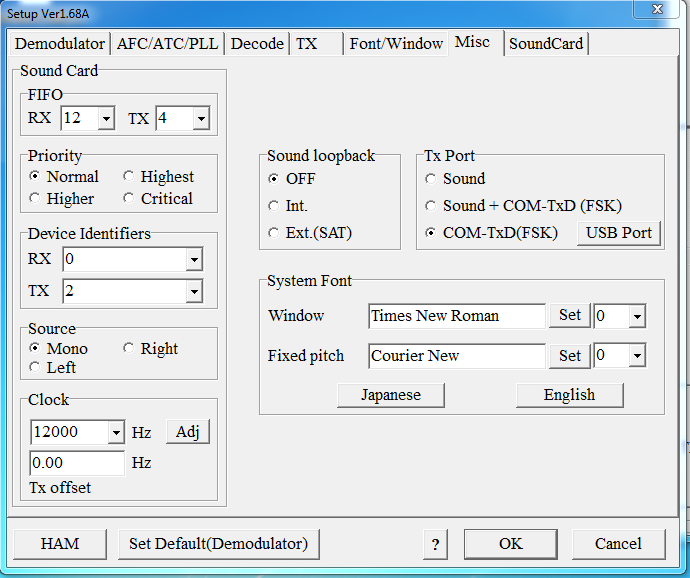
- From the Misc tab, select COM-TxD(FSK).
.
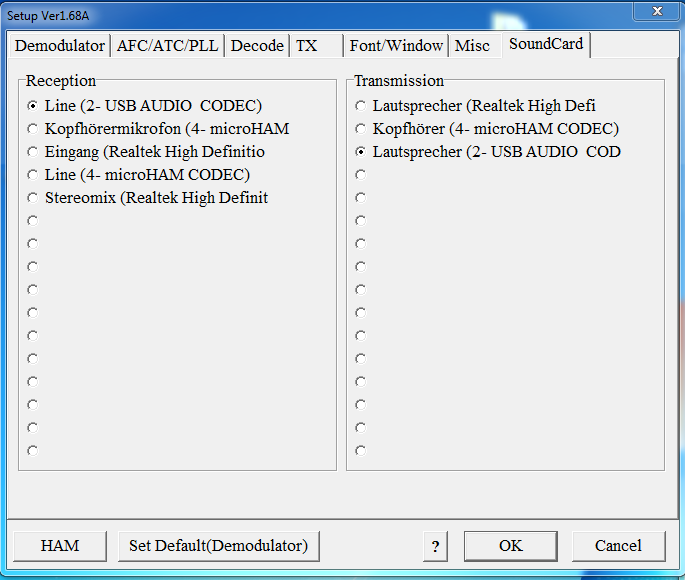
- Select the SoundCard tab. Since we now have more than one (virtual) sound cards we must make sure we're receiving on the right device. The transmit side is irrelevant here, since we do not transmit through the sound card.
.
- Exit the Setup screens by pressing the OK button.
We are now ready to do some tests with MMTTY.
- Set filter bandwidth to 250..500 Hz.
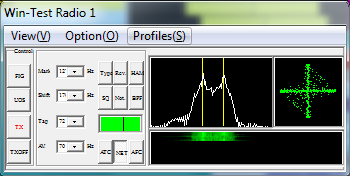
- Now take a look at the XY Scope display. It should look like the picture above.
- If you only see a single white point in the middle of the display, this means, that MMTTY gets no receive audio to process.
- Did you select the correct audio device?
- Tune across the CW band and check if the XY scope changes when you hear signals. Once you tune across a carrier or CW signal, you should see a vertical ellipse and then a horizontal ellipse or vice versa depending on which direction you tune. The receive section of the screen will show all kinds of clutter.
- Try to find a RTTY signal (not easy on a normal day). Both ellipses should now be perpendicular to each other. See if you can decode RTTY fine. You may have to select proper filters. I use 500 Hz at 8.8 MHz IF and 2.7 kHz at 455 kHz IF.
- Next, press the TX button in the MMTTY application. You should hear the typical RTTY diddle in the monitor of the radio. The XY Scope will also display a clean RTTY signal.
- Type a few characters (including your callsign) and see how they are transmitted.
- Press the TX button one more time to shut off transmission.
- Exit the MMTTY program now.
MMTTY now works perfectly as a stand-alone progam. We are now ready for Win-Test.
Win-Test
- Start up Win-Test, create a new Win-Test file for testing.
- Select DXpedition and allow All Modes so you can test all three different modes.
- in the Options | Configure Interfaces... menu
- configure Radio on COM3
- Go to Configure MMTTY.EXE startup path as described in the RTTY section of this manual if you are planning for RTTY operation
We are now ready to operate the contest.
