BestPractice7
Jump to navigation
Jump to search

Setting up a Yaesu FTDX-101
This article is a step by step approach describing how to set up an Yaesu FTDX-101 using the built-in USB interface. This article covers the set-up of RTTY in several steps.
Yaesu FTDX-101
- Download and install the Yaesu FTDX-101 driver FTDX101D/MP USB Driver (Virtual COM Port Driver) from the Yaesu Home Page on your computer.
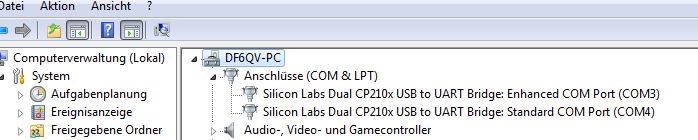
- After connecting the radio, you will find two new COM ports, in my case COM3 and COM4. COM3 will be used for CAT control, COM4 for FSK keying.

Device Manager shows the new COM ports after installing the YAESU driver
MMTTY
- Download and Install MMTTY from here.
- Also download the EXTFSK package from there. The ZIP file you are looking for is named extFSK106.zip.
- Extract and copy ExtFSK.dll to the MMTTY directory. There is nothing else to do to install this software.
- Start MMTTY
     über com 4 haben wir aus MMTTY  über  "Extfsk" und "COM-TxD(FSK)  USB Port
     die Steuerung für FSK mit dem DTR Signal und die Steuerung der PTT mit dem
     RTS Signal in dem Fenster der EXTFSK dll  eingestellt.
     Dazu muss aber die EXTFSK DLL im MMTTY verzeichnis sein. Bei mir war das
     zunächst nicht der Fall, aber Google fragen hat eine Quelle zum download gefunden.
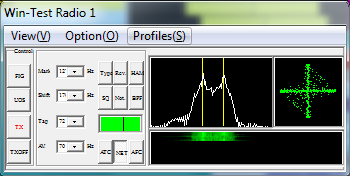
- Activate the XY Scope by selecting the View(V) menu item and tagging XYScope

The XY Scope is a practical tuning aid and will help us to visualize the received signals.
- Go to Option(O) | Setup MMTTY(O)...
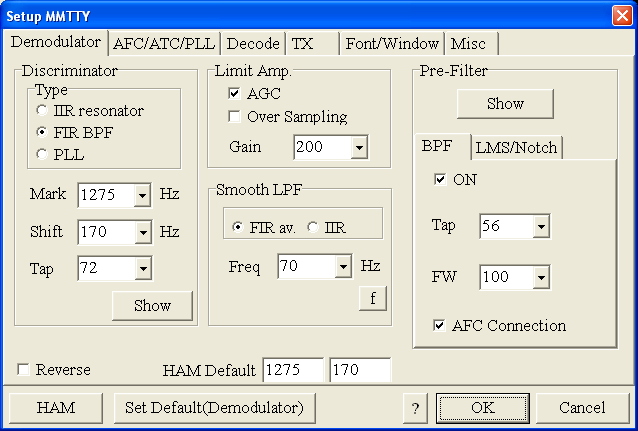
- Select the Demodulator tab and set it up like in the picture below.

MMTTY Demodulator settings
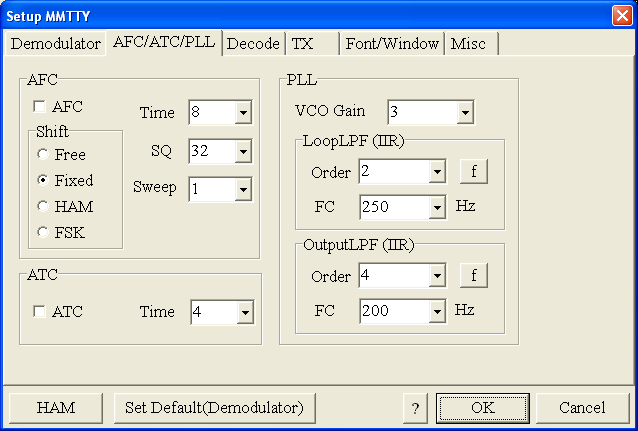
- Select the AFC/ATC/PLL tab and make sure AFC is OFF.

MMTTY AFC/ATC/PLL settings. Make sure AFC is off as it will eventually introduce a deviation between TX and RX frequencies.
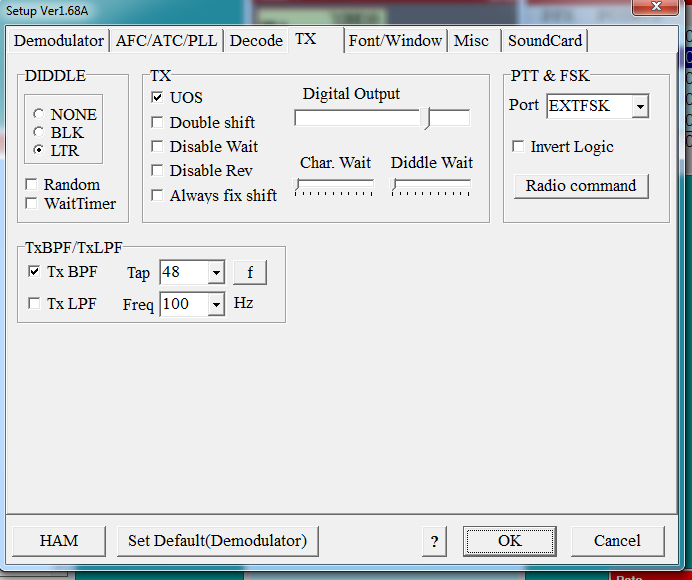
- Select the TX tab and switch PTT port to EXTFSK. The Radio Command button in this setup screen will allow you to control the radio from within MMTTY. This is not desired in this scenario so make sure it is not configured - otherwise Win-Test would not have access to the radio COM port later.

MMTTY Tx settings - FSK and PTT are generated by EXTFSK.DLL COM4
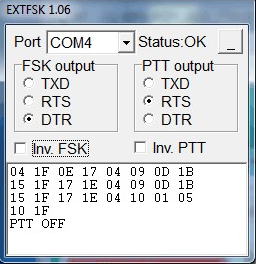
- Setup EXTFSK to key COM4, DTR is used for FSK, RTS is used for PTT. Also you have to activate Inv. FSK.

MMTTY Tx settings - FSK and PTT are generated by EXTFSK.DLL COM4
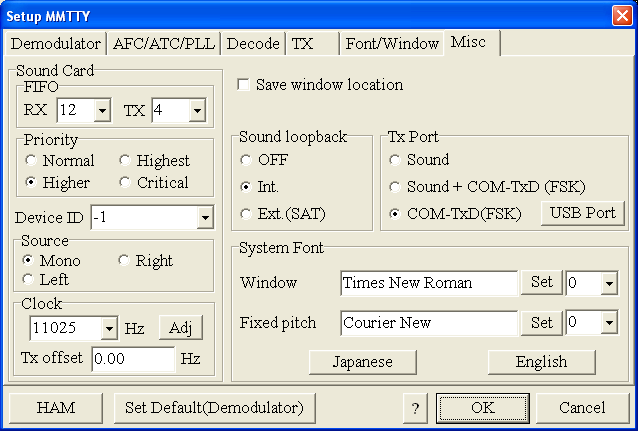
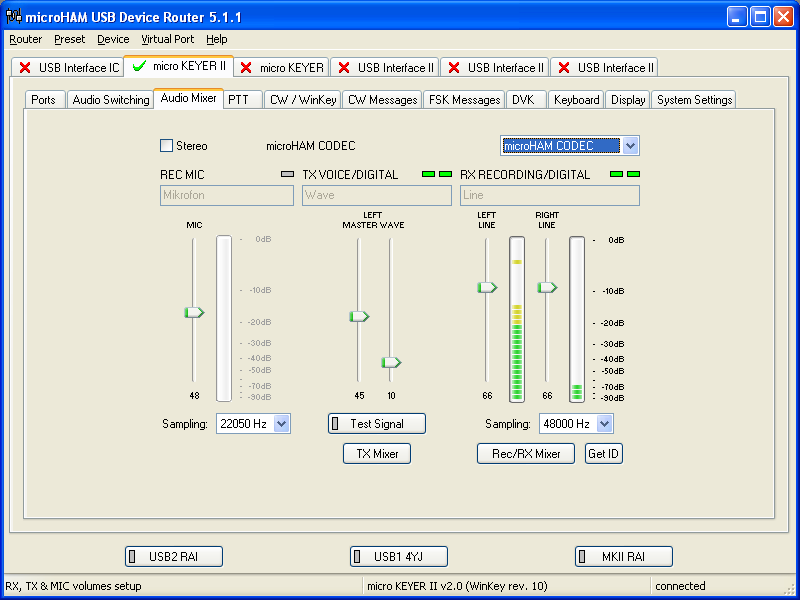
- Select the Misc tab. Since we now have two sound cards - one in the computer, one built into the MKII called microHAM CODEC - we must make sure we're listening on the latter. Switch to the USB router's Audio Mixer Tab and get the device ID by clicking on the button "Get ID" in the lower right corner. This ID must be entered into MMTTY's Device ID field. When listening on the correct device, the LINE LED on the MKII should be lit.
- Also from the Misc tab, select COM-TxD(FSK).

MMTTY Misc settings - FSK is generated via COM4
.
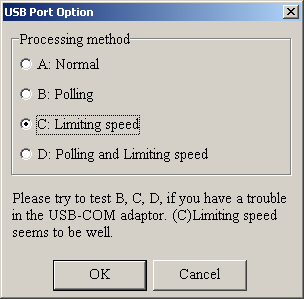
- Should you have problems generating the FSK signal (especially: keying does work, you hear the RTTY diddle, but no characters are being transmitted), you might have to limit the USB port speed in MMTTY. This setting depends very much on the computer hardware. To limit the USB port speed click on USB Port and configure option "C". You can find this setting also in the support documentation of the Microkeyer on the microHAM website.

MMTTY USB Port Option - Set only to option C if A does not work for you.
- Exit the Setup screens by pressing the OK button.
We are now ready to do some tests with MMTTY.
- Now take a look at the XY Scope display. It should look like the picture above.
- If you only see a single white point in the middle of the display, this means, that MMTTY gets no audio to process.
- Check your cabling. Is your cable connected to Line-in or Mic-in?
- Did you select the correct audio device?
- Check the level settings for the sound card from the USB Router's Audio Mixer tab. When you move the control up and down you should see an increase and decrease in noise level.

Setting the correct audio level on the microHAM CODEC sound card
- Tune across the CW band and check if the XY scope changes when you hear signals. Once you tune across a carrier or CW signal, you should see a vertical ellipse and then a horizontal ellipse or vice versa depending on which direction you tune. The receive section of the screen will show all kinds of clutter.
- Try to find a RTTY signal (not easy on a normal day). Both ellipses should now be perpendicular to each other. See if you can decode RTTY fine. You may have to select proper filters. I use 500 Hz at 8.8 MHz IF and 2.7 kHz at 455 kHz IF.
- Next, press the TX button in the MMTTY application. You should hear the typical RTTY diddle in the monitor of the radio. The XY Scope will also display a clean RTTY signal.
- Type a few characters (including your callsign) and see how they are transmitted.
- Press the TX button one more time to shut off transmission.
- Exit the MMTTY program now.
MMTTY now works perfectly as a stand-alone progam. We are now ready for Win-Test.
Win-Test

Final steps: Win-Test Interfaces configuration. Note that we only set up three COM ports, no PTT or CW settings are needed as they are all generated/controlled by the MKII.
- Start up Win-Test, create a new Win-Test file for testing.
- Select DXpedition and allow All Modes so you can test all three different modes.
- in the Options | Configure Interfaces... menu
- configure Radio on COM6
- configure Winkey on COM7 using default settins
- configure microHAM MK/MKII on COM9
- untag Win-Test's internal Voice Keyer
- Go to Configure MMTTY.EXE startup path as described in the RTTY section of this manual if you are planning for RTTY operation
We are now ready to operate the contest.