Difference between revisions of "BestPractice1"
m (→Win-Test) |
|||
| (8 intermediate revisions by 3 users not shown) | |||
| Line 1: | Line 1: | ||
===Getting ready for a RTTY Contest=== | ===Getting ready for a RTTY Contest=== | ||
| − | This article describes how to set up a Kenwood TS-850, a microHAM USB II Interface and accompanying software for use during a RTTY contest. We will use PTT, FSK keying (low tones 1275/1445 Hz) and transceiver control. For details why this makes the best sense please see AA5AU's excellent [http://www.aa5au.com/rtty | + | This article describes how to set up a Kenwood TS-850 or FT-1000MP, a microHAM USB II Interface and accompanying software for use during a RTTY contest. We will use PTT, FSK keying (low tones 1275/1445 Hz) and transceiver control. For details why this makes the best sense please see AA5AU's excellent [http://www.aa5au.com/rtty/getting-started-on-rtty tutorial pages]. Another good [http://www.bartg.org.uk/usefulinformation.asp starter article on RTTY] comes from G3LDI. |
This article should give you some idea on what areas to look at when you are going for this relatively complex scenario. | This article should give you some idea on what areas to look at when you are going for this relatively complex scenario. | ||
| Line 15: | Line 15: | ||
To test the settings, put the radio to FSK mode, push the MONI button and then switch the radio to transmit by pressing REC/SEND. | To test the settings, put the radio to FSK mode, push the MONI button and then switch the radio to transmit by pressing REC/SEND. | ||
You should now hear a 1275 Hz tone. If you short the RTTY jacket on the back of the radio you should hear the tone going up to 1445 Hz. | You should now hear a 1275 Hz tone. If you short the RTTY jacket on the back of the radio you should hear the tone going up to 1445 Hz. | ||
| + | |||
| + | ===Yaesu FT-1000MP settings=== | ||
| + | * Press and hold [FAST] then press [ENT] to access the FT-1000MP menus | ||
| + | * Rotate the MEM/VFO CH knob to select the following menu items | ||
| + | * Select menu 6-1, change the RTTY Polarity to REVERSE (rotate the main tuning knob to change it) | ||
| + | * Select menu 6-2, change the RTTY Tone to LO TONE (Mark = 1275 Hz) | ||
| + | * Select menu 6-3, change the RTTY Frequency Display to OFFSET | ||
| + | * Press [RTTY] until the [LSB] button illuminates indicating RTTY-LSB FSK mode | ||
| + | |||
| + | ===MMTTY settings for FT-1000MP=== | ||
| + | * Select Option, Setup MMTTY, Demodulator tab, set Ham Default to 1275, then press the [Ham] button | ||
| + | * AFC tab, ''remove'' the check mark from AFC | ||
| + | * Font/Window tab, under XYScope, ''check'' the Reverse Rotation box | ||
| + | * TX tab, PTT port, select the real or virtual COM port being used for the radio's PTT | ||
| + | * Misc tab, set Device ID to -1 to use the Windows default recording device. Select the Windows Control Panel, Sounds and Audio Devices, Audio Tab, Sound recording, Default Device to change the default, -or- | ||
| + | * Misc tab, set Device ID to the number corresponding to the desired Audio CODEC device. If using a microHAM MK2R+, in the microHAM DEVICE ROUTER program, Audio Mixer tab, on the RX RECORDING/DIGITAL side of the menu, press the GET ID button and use the "WAVE IN" device number displayed in the pop-up message as the MMTTY Device ID. | ||
| + | * Misc tab, under Tx Port, select COM-TxD (FSK) | ||
| + | * Misc tab, click the [USB Port] button, select Processing Method C: Limiting speed | ||
| + | * Press [OK] | ||
===microHAM USB Interface II=== | ===microHAM USB Interface II=== | ||
| Line 44: | Line 63: | ||
* Download and Install MMTTY from [http://mmhamsoft.amateur-radio.ca/mmtty/ here]. | * Download and Install MMTTY from [http://mmhamsoft.amateur-radio.ca/mmtty/ here]. | ||
| − | * If you plan to use FSK, also download the [http://mmhamsoft.amateur-radio.ca/extfsk.htm EXTFSK] package from there. The ZIP file you are looking for is named [http://mmhamsoft.amateur-radio.ca/files/programs/comfsk105.zip | + | * If you plan to use FSK, also download the [http://mmhamsoft.amateur-radio.ca/mmtty/extfsk.htm EXTFSK] package from there. The ZIP file you are looking for is named [http://mmhamsoft.amateur-radio.ca/files/programs/comfsk105.zip comfsk105.zip]. |
* Extract and copy ExtFSK.dll to the MMTTY directory. There is nothing else to do to install this software. | * Extract and copy ExtFSK.dll to the MMTTY directory. There is nothing else to do to install this software. | ||
Latest revision as of 16:25, 18 April 2015
Getting ready for a RTTY Contest
This article describes how to set up a Kenwood TS-850 or FT-1000MP, a microHAM USB II Interface and accompanying software for use during a RTTY contest. We will use PTT, FSK keying (low tones 1275/1445 Hz) and transceiver control. For details why this makes the best sense please see AA5AU's excellent tutorial pages. Another good starter article on RTTY comes from G3LDI.
This article should give you some idea on what areas to look at when you are going for this relatively complex scenario. It is a step-by-step approach with a little test at the end of each step to make sure things are working on the lower level before we go up to the next. First we will setup the hardware; next we will set up MMTTY as a stand-alone application; finally we will integrate that into Win-Test. I wrote it down after a number of debug sessions at various locations, where a lot of hair was torn out.
Kenwood TS-850 settings
- Press and hold the LSB/USB key while you turn the radio on.
- Select menu item 11 and change the setting to ON if necessary. This will set the polarity of MARK and SPACE signals.
- Select menu item 12 and change the setting to 170 if necessary - this is the typical shift used on the HF bands.
- Select menu item 13 and change the setting to 1275 if necessary. This selects the LOW TONES pair.
- Press the CLR button to leave the setup menu.
To test the settings, put the radio to FSK mode, push the MONI button and then switch the radio to transmit by pressing REC/SEND. You should now hear a 1275 Hz tone. If you short the RTTY jacket on the back of the radio you should hear the tone going up to 1445 Hz.
Yaesu FT-1000MP settings
- Press and hold [FAST] then press [ENT] to access the FT-1000MP menus
- Rotate the MEM/VFO CH knob to select the following menu items
- Select menu 6-1, change the RTTY Polarity to REVERSE (rotate the main tuning knob to change it)
- Select menu 6-2, change the RTTY Tone to LO TONE (Mark = 1275 Hz)
- Select menu 6-3, change the RTTY Frequency Display to OFFSET
- Press [RTTY] until the [LSB] button illuminates indicating RTTY-LSB FSK mode
MMTTY settings for FT-1000MP
- Select Option, Setup MMTTY, Demodulator tab, set Ham Default to 1275, then press the [Ham] button
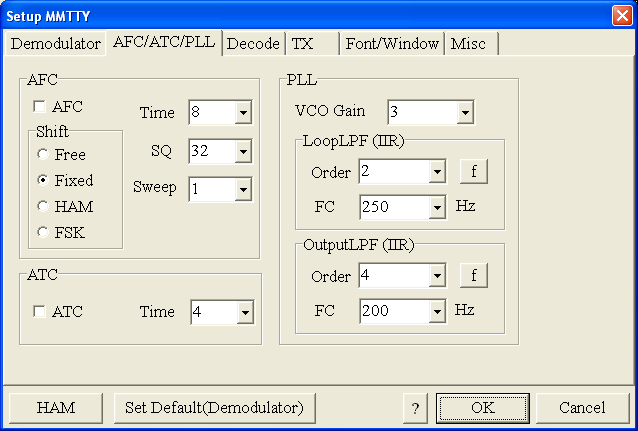
- AFC tab, remove the check mark from AFC
- Font/Window tab, under XYScope, check the Reverse Rotation box
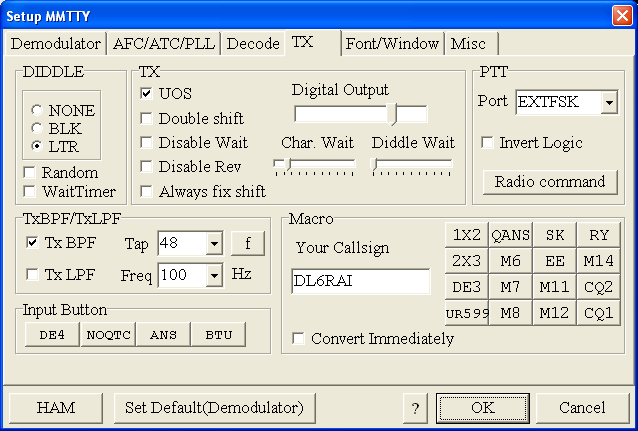
- TX tab, PTT port, select the real or virtual COM port being used for the radio's PTT
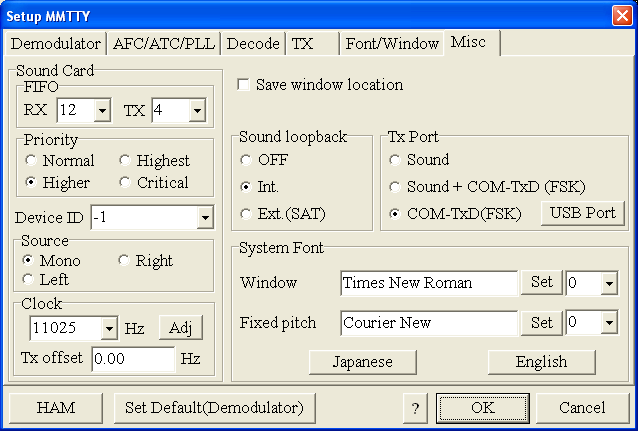
- Misc tab, set Device ID to -1 to use the Windows default recording device. Select the Windows Control Panel, Sounds and Audio Devices, Audio Tab, Sound recording, Default Device to change the default, -or-
- Misc tab, set Device ID to the number corresponding to the desired Audio CODEC device. If using a microHAM MK2R+, in the microHAM DEVICE ROUTER program, Audio Mixer tab, on the RX RECORDING/DIGITAL side of the menu, press the GET ID button and use the "WAVE IN" device number displayed in the pop-up message as the MMTTY Device ID.
- Misc tab, under Tx Port, select COM-TxD (FSK)
- Misc tab, click the [USB Port] button, select Processing Method C: Limiting speed
- Press [OK]
microHAM USB Interface II
- Make sure you have read the user manual and configured the microHAM Interface for Kenwood using the internal jumpers.
- Connect the microHAM USB Interface II to your radio and computer.
- On the radio side there will be four connections: CW, RTTY, ACC1 and ACC2,
- On the computer side there will be three connections: USB, Line-out and Line-in (or microphone). For FSK operation we can actually skip the Line-out connection.
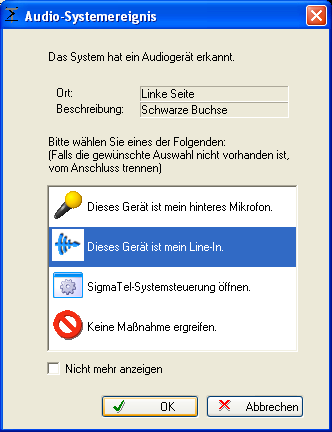
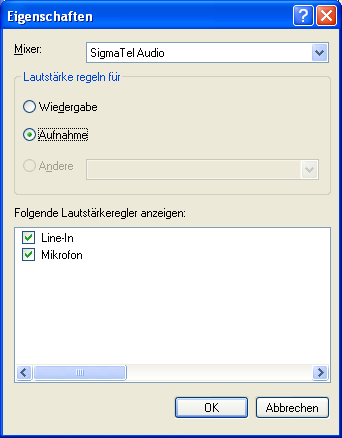
- On my computer, once you connect the Line-in cable, a popup will ask, if this is a microphone or Line-in (see image below). Select Line-in.
- Install the microHAM software if you haven't done so already. There are two steps to it:
- Installing the device driver - if you have several microHAM devices you will have to do this once for each of them.
- Installing the USB Device Router - this software only needs to be installed once. It is identical on all microHAM products.
mircoHAM USB Device Router
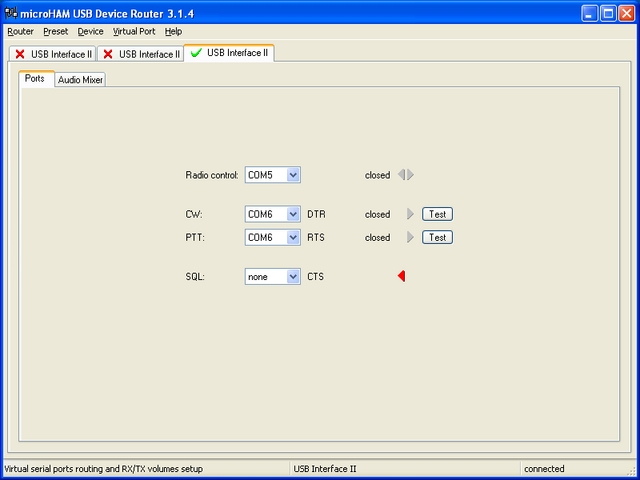
- Set up the Device Router
- Create two virtual COM ports. Don't try to use same port for radio control PTT/CW/FSK switching - use two different ones, like COM5 and COM6
- Configure Radio on COM5
- Configure CW on COM6 DTR
- Configure PTT on COM6 RTS
- SQL is not needed
- Testing
- Press the Test button on the PTT line. The radio should switch to transmit.
- Press the Test button on the CW line. The sidetone should be audible now.
MMTTY
- Download and Install MMTTY from here.
- If you plan to use FSK, also download the EXTFSK package from there. The ZIP file you are looking for is named comfsk105.zip.
- Extract and copy ExtFSK.dll to the MMTTY directory. There is nothing else to do to install this software.
- Start MMTTY
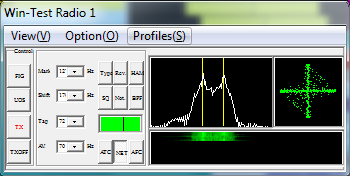
- Activate the XY Scope by selecting the View(V) menu item and tagging XYScope
- Go to Option(O) | Setup MMTTY(O)...
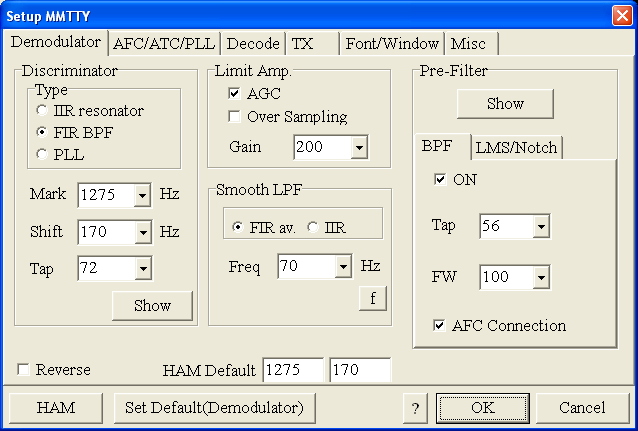
- Select the Demodulator tab and set it up like in the picture below.
- Select the AFC/ATC/PLL tab and make sure AFC is OFF.
- Select the TX tab and switch PTT port to EXTFSK. The Radio Command button in this setup screen will allow you to control the radio from within MMTTY. This is not desired in this scenario so make sure it is not configured - otherwise Win-Test would not have access to the radio COM port later.
- Select the Misc tab and select COM-TxD (FSK) as Tx Port.
- Exit the Setup screens by pressing the OK button.
We are now ready to do some tests with MMTTY.
- Now take a look at the XY Scope display. It should look like the picture above. If you only see a single white point in the middle of the display, this means, that MMTTY gets no audio to process.
- Check your cabling. Is your cable connected to Line-in or Mic-in?
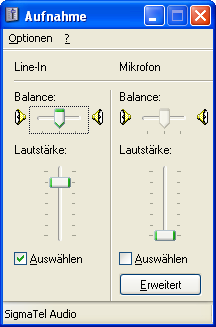
- Check the level setting for your sound card. Open the Sound control (click on the loudspeaker symbol in your task bar), switch to the Recording section and adjust the level for Line-in. When you move the control up and down you should see an increase and decrease in noise level.
- Tune across the CW band and check if the XY scope changes when you hear signals. Once you tune across a carrier or CW signal, you should see a vertical ellipse and then a horizontal ellipse or vice versa depending on which direction you tune. The receive section of the screen will show all kinds of clutter.
- Try to find a RTTY signal (not easy on a normal day). Both ellipses should now be perpendicular to each other. See if you can decode RTTY fine. You may have to select proper filters. I use 500 Hz at 8.8 MHz IF and 2.7 kHz at 455 kHz IF.
- Next, press the TX button in the MMTTY application. You should hear the typical RTTY diddle in the monitor of the radio. The XY Scope will also display a clean RTTY signal.
- Type a few characters (including your callsign) and see how they are transmitted.
- Press the TX button one more time to shut off transmission.
- Exit the MMTTY program now.
MMTTY now works perfectly as a stand-alone progam. We are now ready for Win-Test.
Win-Test
- Start up Win-Test, create a new Win-Test file for testing.
- Go to Configure MMTTY.EXE startup path as described in RTTY#Win-Test_RTTY_configuration.
- Configure Radio Control
We are now ready to operate the contest.
See also
- Win-Test Manual section on RTTY
